Let me tell you something – when I first got the Marked for Death quest from Tian Wen in ARC Raiders, I thought it would be a simple run-of-the-mill fetch mission. Boy, was I wrong! This quest actually has some tricky parts that had me scratching my head for a good while. But don’t worry, I’m here to walk you through exactly how I completed it, and I’ll share all the tips and tricks I learned along the way.
What is the Marked for Death Quest?
Before we dive into the nitty-gritty, let me give you some context. The Marked for Death quest is given by Tian Wen, one of the traders back at Esperanza. When you talk to her, she’ll say something like, “Someone has been lifting supplies from my drop-off point in Buried City. I’ve set up a trap, but need someone to check it for me.”
This quest is actually the first in Tian Wen’s personal quest chain, and it’s all about figuring out who’s been messing with her supply caches. I found it pretty interesting because it gives you a little more insight into Tian Wen’s character and the challenges she faces running her trading operation in this post-apocalyptic world.
Quest Overview
Here’s a quick breakdown of what you’ll need to do:
| Quest Element | Details |
|---|---|
| Quest Giver | Tian Wen at Esperanza |
| Location | Buried City map |
| Previous Quest | Broken Monument |
| Next Quest | Market Correction |
| Main Objectives | • Reach Su Durante Warehouses<br>• Search for Tian Wen’s cache<br>• Follow the clues |
| Rewards | • Shotgun Choke II<br>• Angled Grip II |
Preparing for the Quest
Before you head out, let me share some crucial preparation tips I learned the hard way:
Loadout Strategy
I can’t stress this enough – use a free loadout for this quest! Here’s why: you don’t actually need to extract with any items to complete Marked for Death. I made the mistake of bringing my best gear on my first attempt, and when I got jumped by some hostile players, I lost everything. Learn from my mistake!
If you’re planning to do some looting while you’re in Buried City (which I totally recommend), you might want to bring a Raider Hatch Key. There’s a Raider Hatch near the Collapsed Supermarket that makes for a pretty safe extraction point if things get dicey.
Recommended Items
Based on my experience, here’s what I’d suggest bringing:
| Item Type | Recommendation | Why |
|---|---|---|
| Weapons | Medium-range rifle | Good for both PVE and potential PVP |
| Healing | 2-3 medkits | You never know when you’ll need them |
| Utility | Flashlight | The warehouse area can be dark |
| Special | Raider Hatch Key | For safe extraction near Collapsed Supermarket |
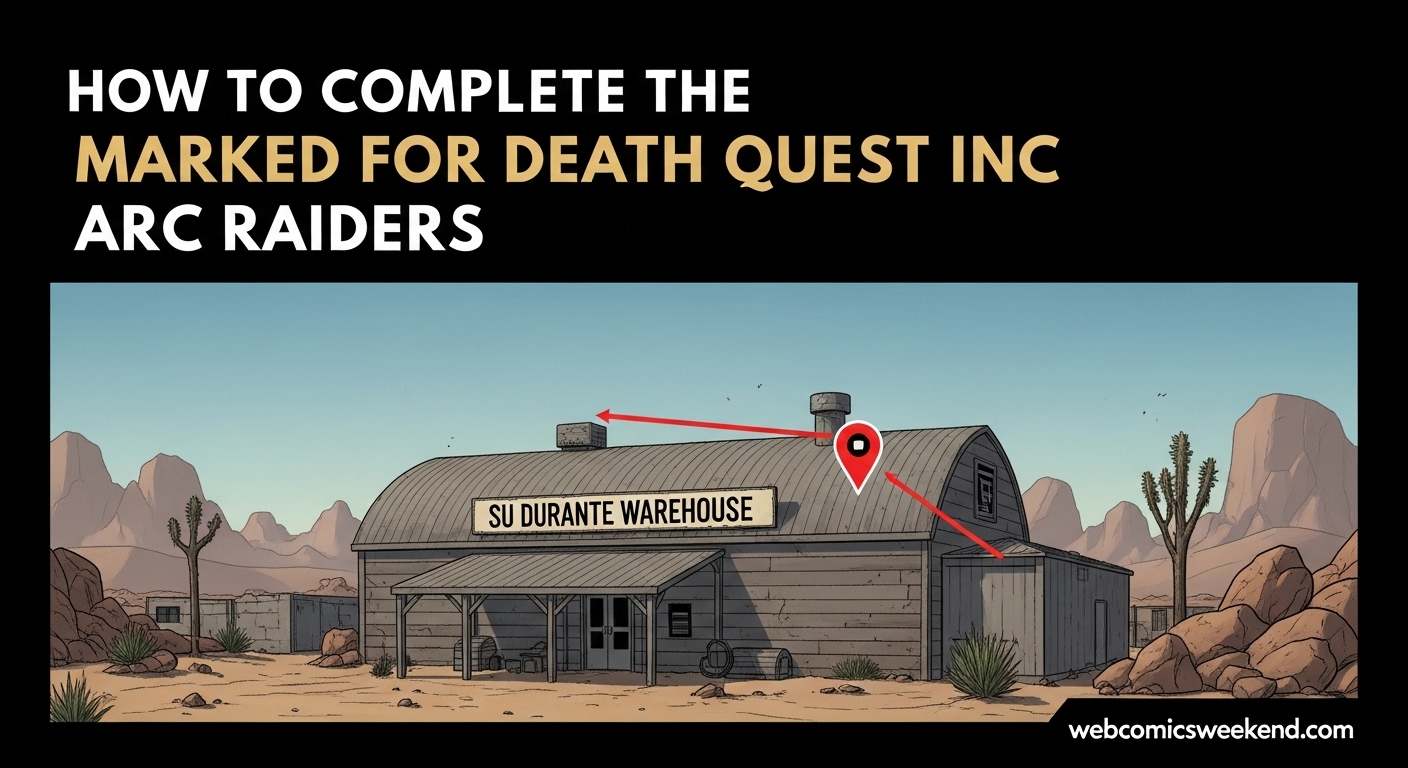
Step 1: Reaching Su Durante Warehouses
Alright, let’s get to the main event. Your first objective is to reach the Su Durante Warehouses in the Buried City. Here’s exactly how I found it:
Location Details
The Su Durante Warehouses are located in the northern part of the Buried City, specifically in the upper left corner of your map. If you’re looking at your map, you’ll want to head north of the yellow-colored Library building – it’s a pretty good landmark to use for navigation.
I found that approaching from the northwest side works best, as it puts you closer to where you need to be and avoids some of the more heavily trafficked areas in the center of the map.
Navigation Tips
When I was making my way there, I noticed a few things that might help you:
- Stick to the outskirts: Since the warehouses are on the edge of the map, you can stay in the less populated areas and avoid unnecessary confrontations
- Watch for other players: This is a popular quest, so expect to see other Raiders in the area
- Be aware of ARC patrols: Even though it’s the outskirts, I still ran into some ARC drones, so stay alert
Step 2: Finding Tian Wen’s Cache
This is where things get interesting, and honestly, where I got stuck for a while. The cache isn’t where you might expect it to be!
Cache Location
The cache is outside the warehouse building, not inside as you might assume. Here’s exactly where I found it:
- Approach the warehouse from the west side
- Look along the western wall of the building
- Find the square container – it’s the same type of breach and search crate you’ve probably seen elsewhere
- Interact with it when you see the yellow prompt
I made the mistake of searching inside the warehouse for a good 10 minutes before I realized it was outside. Don’t be like me – save yourself the frustration!
Visual Cues
Here’s what to look for:
- A standard breach/search crate marked in yellow
- Positioned against the western wall of the warehouse
- Ground-level – it’s not elevated or hidden on a roof
When I finally found it, I felt pretty silly for missing something so obvious, but that’s how these quests sometimes work!
Step 3: Following the Clues
Okay, so you’ve found the cache – great! But now the quest updates to “follow the clues,” and the game doesn’t exactly hold your hand here. This is the part that really confused me at first.
What Are the Clues?
The clues are actually footprints in the sand near the cache. Here’s what I noticed:
- The footprints are more deeply engraved in the sand than regular footprints
- They lead away from the cache in a specific direction
- They’re pretty obvious once you know what to look for
Following the Footprints
When I was doing this quest, here’s exactly what worked for me:
- Stand at the cache and look at the ground around you
- Look for the distinctive footprints – they’ll stand out from regular sand texture
- Follow them westward into a small thicket or group of trees
- Look for a metal plate sticking out of the ground
The footprints led me to a small group of trees, and there it was – a metal plate sticking out of the sand. It’s not very big, so you might need to look closely, but it’s definitely there.
Final Interaction
Once you find the metal plate, simply interact with it, and congratulations – you’ve completed the Marked for Death quest! The game will give you a notification, and you can head back to Tian Wen to collect your rewards.
Quest Rewards
So, what do you get for all your trouble? Let me tell you, the rewards are actually pretty decent:
| Reward Item | Description | Value |
|---|---|---|
| Shotgun Choke II | Improves shotgun accuracy and range | 2,000 Coins |
| Angled Grip II | Better weapon stability and control | 2,000 Coins |
Both of these attachments are really useful if you’re running shotguns or want better weapon control. I’ve been using the Angled Grip II on my primary weapon, and it’s made a noticeable difference in recoil control.
Tips and Tricks I Learned
After completing this quest multiple times (because I’m a completionist like that), I’ve picked up some additional tips that might help you:
Timing Your Run
I found that early morning or late evening server times tend to be less crowded. Fewer players mean less chance of getting into unwanted firefights while you’re trying to complete the quest.
Alternative Routes
While the direct route to the warehouses is fine, I sometimes take a slightly longer path along the northern edge of the map. It adds a few minutes to my journey but keeps me away from high-traffic areas.
Extraction Strategy
Even though you don’t need to extract with quest items, I usually plan my extraction route beforehand. The Northern Station by the Library is a good option, or if you have that Raider Hatch Key, the one near Collapsed Supermarket works great too.
Dealing with Other Players
Let’s be real – you’re going to run into other players doing the same quest. Here’s my approach:
- Don’t shoot first – many players are just trying to complete the quest like you
- Use voice chat if you’re comfortable – a quick “just doing the quest” can prevent misunderstandings
- Have an escape plan – know where you can run if things turn hostile
Common Problems and Solutions
I’ve seen a lot of players struggle with this quest, so let me address some common issues:
“I Can’t Find the Cache!”
This is probably the most common issue I hear. If you’re having trouble:
- Make sure you’re at the right warehouse – there are several in the area
- Check the western wall – not the eastern side as some guides mistakenly suggest
- Look for the yellow interaction prompt – it’s hard to miss once you’re close enough
“The Footprints Aren’t Showing Up!”
This happened to me too. Here’s what worked:
- Adjust your graphics settings – sometimes lower settings make environmental details harder to see
- Look at different angles – the footprints might be more visible from certain positions
- Wait a moment – sometimes it takes a second for the game to render the details properly
“Other Players Keep Killing Me!”
Yeah, this is frustrating but common in extraction games. My advice:
- Try different server times – play when it’s less busy
- Use a free loadout – so you don’t lose anything important
- Consider going with a squad – safety in numbers, my friend
How This Quest Fits Into the Bigger Picture?
The Marked for Death quest isn’t just a standalone mission – it’s part of Tian Wen’s larger story arc. After completing it, you’ll unlock the Market Correction quest, which continues the investigation into who’s been messing with Tian Wen’s supplies.
I actually found this quest chain really interesting because it gives you more insight into the political and economic struggles within Speranza. It’s not just about shooting robots and looting – there’s actual story and character development happening.
Comparison to Other Quests
If you’ve done other quests in ARC Raiders, you might be wondering how this one stacks up. In my experience:
| Aspect | Marked for Death | Similar Quests |
|---|---|---|
| Difficulty | Easy-Medium | Generally easier than multi-region quests |
| Time Required | 15-30 minutes | Shorter than most other quests |
| Risk Level | Low-Medium | Less risky than central city quests |
| Reward Value | Good | Comparable to other early-mid game quests |
I found it significantly easier than quests like “What We Left Behind” or “Eyes in the Sky,” but more engaging than simple fetch quests.
Final Thoughts
Look, I’ll be honest with you – the Marked for Death quest isn’t the most complex or challenging quest in ARC Raiders, but it’s definitely one that can trip you up if you don’t know exactly where to look. I hope my guide helps you avoid the frustration I went through on my first few attempts.
The key takeaways are:
- Use a free loadout to avoid losing gear
- The cache is outside the warehouse on the western wall
- Look for footprints in the sand leading to a metal plate
- The rewards are actually pretty useful
If you’re looking for more quest guides, I’ve also written about completing the Broken Monument quest and finding the ESR Analyzer in the “A Reveal in Ruins” quest. Both of those gave me way more trouble than this one did!
Remember to save this guide for later, and feel free to bookmark it – quest mechanics can change with updates, and I’ll do my best to keep this information current. Happy raiding, and I hope you get those sweet, sweet attachments without too much trouble!
FAQ Section
How long does the Marked for Death quest take to complete?
From my experience, it usually takes about 15-30 minutes if you know exactly where to go. If you’re searching blindly like I did on my first attempt, it could take up to an hour. That’s why I wrote this guide – to save you that frustration!
Do I need to extract to complete the quest?
Nope! That’s one of the best things about this quest. You don’t need to extract with any items, so even if you get killed, you can still go back to Tian Wen and get your rewards. I definitely recommend using a free loadout for this reason.
What level should I be to attempt this quest?
I’d say you can attempt this quest at any level, but I found it easier once I was comfortable with basic movement and combat. The quest itself doesn’t require any special skills or high-level gear.
Can I complete this quest solo?
Absolutely! I completed it solo multiple times. In fact, I sometimes prefer going solo for quests like this because it draws less attention from other players.
What happens if I die during the quest?
If you die, you’ll lose any gear you brought (unless you used a free loadout), but the quest progress saves. You can just jump back into another match and continue from where you left off. The game is pretty forgiving in that regard.
Are the rewards worth it?
In my opinion, yes! Both the Shotgun Choke II and Angled Grip II are solid attachments that I still use regularly. They’re worth 2,000 coins each, so you’re getting 4,000 coins worth of useful gear.
Can I repeat this quest?
As far as I know, this is a one-time completion quest. Once you’ve done it, it’s done. But don’t worry – there are plenty of other quests to keep you busy!
What’s the best time to attempt this quest?
I’ve had the most success during off-peak hours when there are fewer players online. Early morning or late evening in your local time zone tends to be best. Less competition means less chance of getting into unwanted firefights.
Do I need any special keys or items?
No special keys are required for the quest itself, but I mentioned bringing a Raider Hatch Key if you want access to that safe extraction point near the Collapsed Supermarket. It’s not necessary, but it’s nice to have.
Will this quest affect my reputation with other traders?
No, completing Tian Wen’s quests only affects your relationship with her. It won’t negatively impact your standing with other traders like Celeste or Shani. In fact, I’ve found that completing quests for one trader sometimes opens up new dialogue options with others.
Remember to save this guide and check back for updates! Game mechanics can change with patches, and I’ll do my best to keep this information current. If you found this helpful, be sure to check out my other ARC Raiders guides for more tips and tricks!