Hey there, fellow Dreamlight Valley enthusiast! If you’re anything like me, you’ve been absolutely loving the Haunted Floating Festival event that’s taken over our valley. I mean, who doesn’t love a good Halloween-themed mystery? But let’s be real – some of these puzzles can be downright tricky, and the Combination Pillar puzzle had me scratching my head for way longer than I’d like to admit.
When I first stumbled upon this puzzle, I was completely stumped. There I was, staring at these four numbered pillars with rotating symbols, wondering what on earth I was supposed to do. If you’re in the same boat, don’t worry! I’ve got you covered with everything you need to know to solve this puzzle and claim that awesome Haunted Festival Dress reward.
What Exactly is the Combination Pillar Puzzle?
So, let’s start with the basics. The Combination Pillar puzzle is one of the five main challenges you’ll encounter during the Haunted Floating Festival event in Disney Dreamlight Valley. It’s this mysterious stone wall with four numbered blocks (I, II, III, IV) that you can rotate to show different symbols.
When I first found it, I was wandering around the floating island (which, by the way, is absolutely gorgeous with all the Halloween decorations) and stumbled upon it opposite the fast-travel well. At first glance, it seems pretty straightforward – just match the right symbols to the right numbers, right? Well, not exactly. The tricky part is figuring out which symbols go where, and that’s where most of us get stuck.
The Secret to Solving the Puzzle
Here’s the thing that took me forever to figure out: the solution isn’t actually on the puzzle itself. You need to explore the entire floating island to find glowing symbol tiles, and each one has a specific number of pumpkins next to it. These pumpkins are your clue!
I spent hours running around that island like a headless chicken before I realized what those pumpkins meant. Each symbol tile has a certain number of pumpkins beside it, and that number corresponds to which numbered pillar it belongs to. For example, if a symbol has three pumpkins next to it, it goes on pillar number III. Genius, right?
All Tile Locations (I Found Them All!)
Okay, let me break down exactly where you need to go to find each symbol tile. I’m going to be super specific because I know how frustrating it can be when guides are vague about locations!
The Witch Hat Tile (Pillar III)
This one’s actually pretty easy to find once you know where to look. Head over to Zero’s grave – you know, that adorable ghost dog from The Nightmare Before Christmas? The grave is right next to the iconic spiral hill from the movie. When you get there, you’ll see the Witch Hat tile glowing with three pumpkins sitting behind it. That’s your clue that it goes on pillar number III!
The Bat Tile (Pillar II)
This one was a bit tricky for me to find, so listen up! You need to go to the stone wall near the “That way” sign that points to the Potion Brewer’s House. Walk through the archway, pass the sign, and then turn around and look up. The Bat tile is right there on the window! You’ll see two pumpkins sitting underneath it, which means it belongs on pillar number II.
The Cat Tile (Pillar IV)
I almost missed this one because it’s kind of hidden! Go to the stone wall near the Coco-themed wishing well. Look for the corner of the wall where there’s a grave and some floating candles (super spooky, right?). The Cat tile is near the top of the wall, and you’ll spot four pumpkins on the ground beneath it. That’s your signal that it goes on pillar number IV.
The Web Tile (Pillar I)
Last but not least, the Web tile! This one’s actually pretty easy to spot. Head over to the Haunted Mansion (you can’t miss it – it’s the huge, spooky building on the island). Walk past the Pale Blooms and go around the right side of the mansion. Just before you reach the Combination Pillar puzzle, look to your left, and you’ll see the Web tile with one pumpkin underneath it. That means it goes on pillar number I.
The Complete Solution (No More Guessing!)
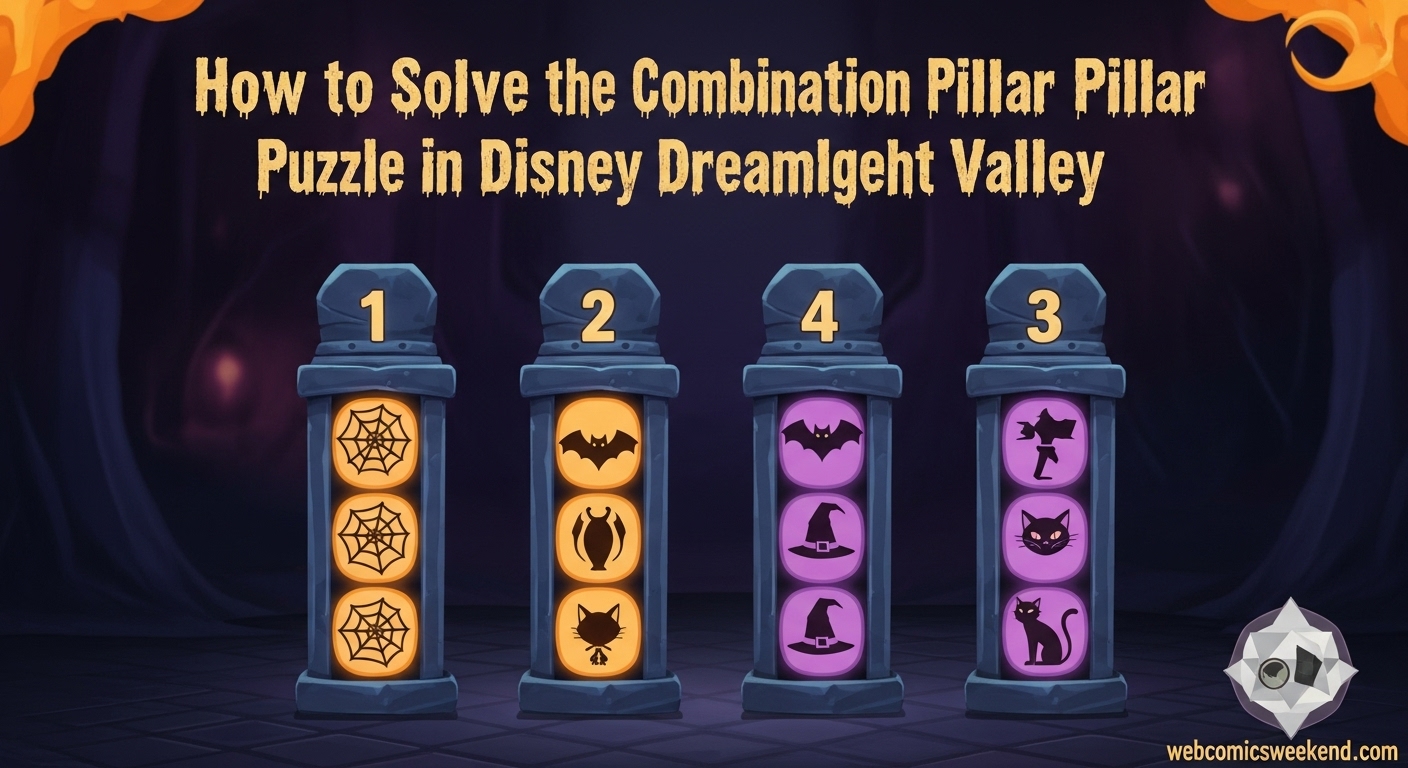
Alright, now that you’ve found all the tiles (or if you just want the quick solution without running around), here’s exactly how to set up those pillars:
- Pillar I: Web symbol
- Pillar II: Bat symbol
- Pillar III: Witch Hat symbol
- Pillar IV: Cat symbol
To change the symbols, just walk up to each pillar and interact with it. The button you need to press depends on what platform you’re playing on, but the game will show you the “Interact” prompt when you’re close enough. Don’t worry if you accidentally go past the right symbol – you can keep rotating until you get to the correct one.
My Experience Solving This Puzzle
I have to be honest with you guys – when I first attempted this puzzle, I was completely lost. I spent at least an hour just randomly trying different combinations, hoping something would work. It wasn’t until I took a step back and really started exploring the island that I noticed those glowing tiles and the pumpkins.
What I love about this puzzle is that it really encourages you to explore every nook and cranny of the floating island. There’s so much detail put into this event, and finding each tile felt like a little victory. The Witch Hat tile was probably my favorite discovery because it’s right next to Zero’s grave, and as a huge Nightmare Before Christmas fan, that little detail just made me smile.
What You Get for Completing the Puzzle?
Okay, so why should you bother with all this? Well, let me tell you – the reward is totally worth it! Once you solve the Combination Pillar puzzle correctly, an item pouch will appear on the ground behind you. Pick it up, and you’ll get the Haunted Festival Dress!
This dress is absolutely gorgeous, by the way. It’s a festive black, orange, and white dress adorned with Halloween symbols like pumpkins and spiderwebs. It’s the only clothing item you can get as a prize throughout the entire event, so trust me, you want to complete this puzzle. I’ve been wearing mine non-stop because it’s just so perfect for the Halloween season!
Tips for Making This Puzzle Easier
Based on my experience, here are some tips that might help you out:
- Take screenshots of each tile location – This way, you don’t have to keep running back and forth if you forget which symbol goes where.
- Start with the tiles first – Before even touching the pillars, explore the entire island and find all four symbol tiles. This will save you a lot of frustration later.
- Use the pumpkins as your guide – Remember, the number of pumpkins always tells you which numbered pillar the symbol belongs to.
- Don’t rush – I know it’s tempting to just want the reward, but take your time and enjoy the exploration. The floating island is beautiful, and there are lots of little details to appreciate.
Other Puzzles in the Haunted Floating Festival
While you’re here, you might as well tackle the other puzzles in the event! There are five in total, and each one gives you a unique reward. I’ve personally completed all of them (yes, I’m a bit obsessed), and here’s what else you can look forward to:
- Ghostly Critter Puzzle – Feed Zero the ghost fox his favorite food (Haunted Skeleton Fish) to get the Clawed Foot Tub.
- Terror-rific Tree Puzzle – Collect various items for the grumpy tree to get your own Howling Tree furniture.
- Potion Brewer’s House Puzzle – Brew a special potion using specific ingredients to get the Black Cauldron.
- Haunted Mansion Puzzle – Answer the Haunted Armor’s quiz questions correctly to get the Haunted Armor furniture.
Why This Event is So Special?
I have to say, the Haunted Floating Festival event is probably my favorite event they’ve done in Disney Dreamlight Valley so far. The attention to detail is incredible, and each puzzle feels unique and challenging in its own way. The floating island is absolutely stunning, with all the Halloween decorations and spooky atmosphere.
What I really love is how the puzzles encourage exploration and observation. It’s not just about following a set of instructions – you really need to pay attention to your surroundings and think about what everything means. That’s exactly what makes this game so special!
Final Thoughts
Solving the Combination Pillar puzzle might seem daunting at first, but once you understand the logic behind it, it’s actually quite straightforward. The key is to explore the island thoroughly and pay attention to those pumpkin clues.
I hope this guide helps you solve the puzzle and get that amazing Haunted Festival Dress! Trust me, it’s worth the effort. And while you’re at it, make sure to check out the other puzzles in the event – they’re all fun and rewarding in their own ways.
Happy gaming, everyone! And don’t forget to enjoy all the spooky fun the Haunted Floating Festival has to offer before it disappears on November 11th!
FAQ
How long does it take to solve the Combination Pillar puzzle?
Honestly, it depends on how quickly you can find all the symbol tiles. For me, it took about 30-45 minutes of exploration, but if you follow this guide, you can probably do it in 10-15 minutes.
What happens if I can’t find one of the tiles?
Don’t worry! All the tiles are in the locations I mentioned above. Take your time and explore each area thoroughly. The tiles glow, so they’re pretty visible once you’re in the right area.
Can I solve the puzzle multiple times?
No, unfortunately, you can only solve each puzzle once per event. But once you’ve completed it, you’ll have the Haunted Festival Dress in your inventory forever!
What if I set the wrong symbols?
No problem at all! You can rotate the symbols as many times as you want until you get the correct combination. The puzzle won’t reset or anything like that.
Is the Haunted Festival Dress available after the event ends?
The dress is exclusive to the Haunted Floating Festival event, so make sure to complete the puzzle before November 11th when the event ends!
Looking for more Disney Dreamlight Valley content? Check out our other gaming guides at WebComicsWeekend.com for tips, tricks, and comprehensive walkthroughs of your favorite games!