Hey there, fellow Raider! If you’re anything like me, you’ve probably been staring at Celeste’s quest board in Speranza, wondering what exactly this “Bees!” quest is all about. I mean, who would’ve thought that in a post-apocalyptic world filled with deadly ARC machines, we’d be out here playing beekeeper? But let me tell you, after spending countless hours figuring this quest out (and failing more times than I’d like to admit), I’ve got your back with the most comprehensive guide you’ll find anywhere.
What Exactly Is the Bees! Quest?
When I first picked up this quest from Celeste, I’ll admit I was pretty confused. The description is pretty vague – something about finding a beehive for the greenhouses in Speranza. But after diving deep into this mission, I can tell you it’s actually one of the more straightforward side quests in Arc Raiders, as long as you know exactly where to go and what to do.
The Bees! quest breaks down into three main objectives:
- Reach the Olive Grove in Blue Gate
- Search for and collect a beehive
- Extract successfully and deliver to the trader
Sounds simple enough, right? Well, let me walk you through each step so you don’t make the same mistakes I did when I first attempted this.
Step 1: Getting to Olive Grove in Blue Gate
First things first – you need to head to the Blue Gate map. If you’re new to Arc Raiders, Blue Gate is one of the main extraction zones you’ll be visiting frequently. The Olive Grove POI (Point of Interest) is located in the southern region of this map, and let me tell you, it’s a pretty popular spot.
When I first started playing, I made the mistake of thinking Olive Grove would be some peaceful, abandoned area. Boy, was I wrong! This place is usually crawling with other raiders because it’s a hotspot for valuable resources like Olives and Lemons – perfect for those Scrappy upgrades we all need.
Navigation Tips for Olive Grove
Here’s exactly how I navigate to Olive Grove every time:
- Load into Blue Gate – Make sure you’re selecting the correct map
- Head south from your drop point – Olive Grove is always in the southern sector
- Look for the distinct olive tree formations – They’re pretty hard to miss once you know what you’re looking for
- Watch your minimap for the POI marker
Table: Olive Grove Location Details
| Detail | Information |
|---|---|
| Map | Blue Gate |
| Region | Southern Sector |
| Coordinates | Approximately Grid D-7 |
| Best Drop Zone | Southern Extraction Zone |
| Common Resources | Olives, Lemons, Scrappy Materials |
| Danger Level | Medium (High player traffic) |
Step 2: Finding the Elusive Beehive
Okay, so you’ve made it to Olive Grove. Now what? This is where I got stuck the first few times I tried this quest. The beehive isn’t just sitting out in the open like you might expect.
The Exact Location
From my experience, here’s the foolproof method to find the beehive:
- Start at the main Olive Grove marker on your map
- Head southwest from the center of the POI
- Look for a small shack or farm structure – it’s not huge, but it’s distinctive
- Listen for the buzzing sound – I’m not kidding, you can actually hear the bees swarming nearby!
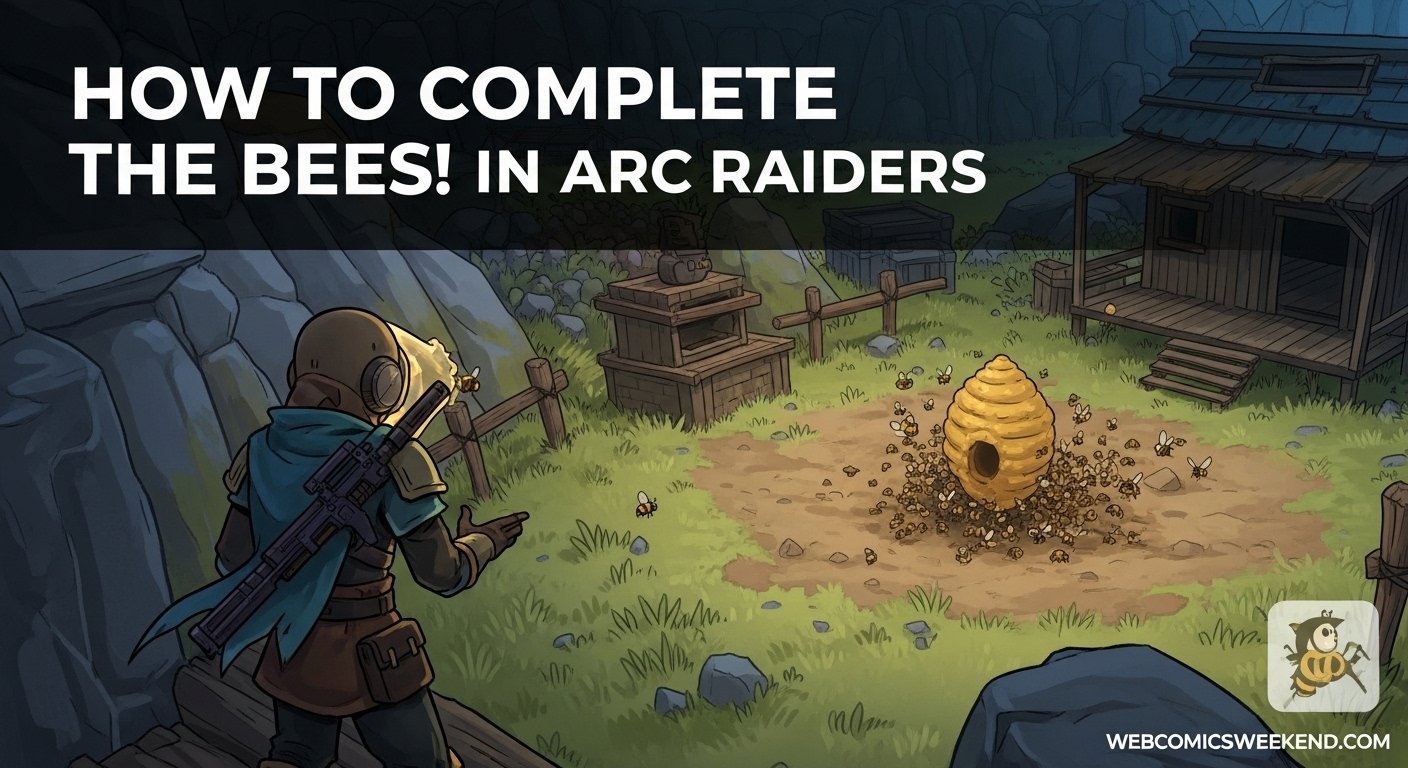
When I finally found it, I felt pretty silly for how long it took me. The beehive is located under the roof overhang on the side of the shack. It’s not hidden in some super secret spot – it’s right there in plain sight once you know where to look.
What to Look For
Let me describe exactly what you’re searching for:
- A large, brown beehive hanging from the shack’s roof
- Bees swarming around it (don’t worry, they won’t hurt you!)
- An interaction prompt when you get close enough
Table: Beehive Location Characteristics
| Feature | Description |
|---|---|
| Appearance | Large brown beehive, honeycomb texture |
| Location | Under roof overhang of shack |
| Sound Cue | Audible buzzing when nearby |
| Visual Cue | Swarming bees around hive |
| Interaction | Hold button to collect |
| Safety | Bees are harmless, won’t attack |
Step 3: Collecting the Beehive
This is where I see most players mess up, including myself the first time around. You can’t just walk up and automatically grab the beehive. Here’s the proper way to do it:
The Collection Process
- Approach the beehive – Get close enough for the interaction prompt to appear
- Press and hold the interact button – Don’t just tap it, hold it down
- Wait for the collection animation – Your character will reach out and grab the hive
- Check your inventory – The beehive should now appear there
I can’t stress this enough – you MUST hold the button, not just tap it. I wasted so much time thinking the quest was bugged because I was just tapping the interact button like I do with everything else in the game.
Important Notes About the Beehive
- It takes up inventory space – Make sure you have room
- It’s a quest item – You can’t use it for anything else
- You’ll drop it if you die – This is crucial!
- It persists through extraction – As long as you extract successfully
Step 4: Extracting Successfully
Now comes the part that gave me the most trouble – getting out of there with the beehive intact. Let me share what I’ve learned through trial and error.
Extraction Points Near Olive Grove
From my experience, you have two main extraction options near Olive Grove:
- Forest Airshaft – Located to the northwest
- Overlook Airshaft – Located to the northeast
Both are viable options, but which one you choose depends on:
- How much time is left in the match
- Where other players are on the map
- Your current loadout and health
Table: Extraction Point Comparison
| Extraction Point | Direction from Olive Grove | Distance | Risk Level | Best For |
|---|---|---|---|---|
| Forest Airshaft | Northwest | Medium | Medium | Quick exits, less player traffic |
| Overlook Airshaft | Northeast | Medium | High | Direct route, but popular spot |
My Extraction Strategy
Here’s the strategy that works best for me:
- Assess the situation – Check the timer and map for enemy players
- Choose the safer extraction point – Usually Forest Airshaft for me
- Move carefully but quickly – Don’t rush, but don’t dawdle either
- Watch for ambushes – Other players love to camp extraction points
- Activate the extraction – Hit the button and get inside
- Return to Speranza – Complete the extraction sequence
2026 Pro Tips I Wish I Knew Earlier
After completing this quest dozens of times, I’ve picked up some tricks that I wish someone had told me about from the start.
Loadout Recommendations
I’ve found that having the right setup makes this quest much easier:
- Safe Pocket Augment – This is a game-changer! It protects your beehive if you die
- Free Loadout – Start with basic gear so you don’t lose much if things go wrong
- Movement-focused build – Helps you get in and out quickly
- Healing items – Always bring more than you think you’ll need
2026 Common Mistakes to Avoid
Let me save you some frustration by sharing the mistakes I made:
- Not holding the interact button – Seriously, hold it down!
- Forgetting to extract with the hive – You must extract successfully
- Dying before extraction – You’ll lose the hive and have to restart
- Going to the wrong trader – Make sure you deliver to the correct NPC
- Assuming it’s bugged – 99% of the time, it’s user error (I learned this the hard way)
Timing Your Run
From my experience, the best time to attempt this quest is:
- Early in the match – Fewer players around
- Mid-week – Less server traffic
- Off-peak hours – If you’re playing during busy times, expect competition
The Rewards: What You Get for Completion
So, what’s in it for you? After all this work, you want to know if it’s worth it, right? Let me break down what I’ve received from completing this quest:
Guaranteed Rewards
Every time I’ve completed the Bees! quest, I’ve received:
- 1x Advanced Electrical Components – Super useful for upgrades
- 3x Sensors – Always need these for crafting
Additional Benefits
Beyond the tangible rewards, completing this quest also:
- Unlocks further questlines – Celeste will have more missions for you
- Increases your reputation – Better standing with Speranza traders
- Provides experience – Helps you level up your character
- Teaches map knowledge – You’ll know Olive Grove like the back of your hand
Table: Complete Reward Breakdown
| Reward Type | Item | Quantity | Usefulness |
|---|---|---|---|
| Crafting Materials | Advanced Electrical Components | 1 | High (rare material) |
| Crafting Materials | Sensors | 3 | Medium (commonly needed) |
| Experience | Quest XP | Varies | High (good progression) |
| Reputation | Speranza Standing | +50 | Medium (unlocks vendors) |
| Progression | Quest Chain Unlock | 1 | High (access to more content) |
Frequently Asked Questions (FAQ)
I’ve answered a lot of questions from fellow raiders about this quest, so let me cover the most common ones:
Q: Does the beehive spawn in the same place every time?
A: Yes! From my experience, the beehive is always in the same location – under the roof of the shack southwest of the Olive Grove marker. It’s not random, so once you know where it is, you can find it easily every time.
Q: Can I complete this quest solo, or do I need a squad?
A: You can absolutely complete this solo! I’ve done it many times by myself. In fact, sometimes going solo is easier because you don’t have to coordinate with teammates and can move at your own pace.
Q: What happens if I die after picking up the beehive but before extracting?
A: Unfortunately, you’ll drop the beehive and the quest will fail. You’ll need to restart the entire quest from the beginning. This is why I always recommend using a Safe Pocket augment – it’s saved me more times than I can count!
Q: Are the bees dangerous? Will they attack me?
A: No, the bees are completely harmless! They’re just there for atmosphere. You can walk right up to the hive without any danger. I was pretty nervous about this my first time, but there’s nothing to worry about.
Q: How long does this quest typically take to complete?
A: Once you know what you’re doing, you can complete this quest in about 10-15 minutes. The first time might take longer as you learn the layout, but it gets much faster with practice.
Q: Can I do other things while carrying the beehive?
A: Yes, you can still fight, loot, and do other activities while carrying the beehive. Just remember that if you die, you’ll lose it, so I recommend focusing on extraction once you have it.
Q: Is this quest worth the time and effort?
A: Absolutely! The rewards are decent, but more importantly, it teaches you valuable map knowledge and extraction skills that will help you throughout the game. Plus, it’s part of a larger quest chain that unlocks more content.
My Personal Experience and Final Thoughts
Let me share a quick story about my first time attempting this quest. I was so confident – I’d been playing Arc Raiders for a while and thought I knew what I was doing. I dropped into Blue Gate, found Olive Grove easily enough, but then spent the next 20 minutes running around like a headless chicken looking for that darn beehive.
When I finally found it (thanks to a helpful teammate who showed me the exact spot), I was so relieved. But then I made the classic mistake of just tapping the interact button instead of holding it. I thought the quest was bugged and almost gave up!
After that, I successfully grabbed the hive but got greedy and decided to do some extra looting before extracting. Big mistake – I ran into another squad, got into a firefight, and died right before reaching the extraction point. I was so frustrated!
But you know what? That failure taught me more than any guide could have. It taught me to respect the quest mechanics, to plan my extraction route, and to always have a backup plan. Now, I can complete this quest in my sleep, and I’m sharing all those hard-earned lessons with you here.
Additional Resources for Arc Raiders Players
If you’re enjoying Arc Raiders as much as I am, you might want to check out some of my other guides:
- For more quest help, check out my guide on Power Out quest – another tricky one that had me stumped for a while
- If you’re struggling with medical quests, I’ve got a complete walkthrough for Prescriptions of the Past
- For combat tips, don’t miss my Flickering Threat quest guide
- And if you need help with water-related missions, I’ve covered the Water Troubles quest as well
These guides will help you become a more well-rounded raider and tackle even the toughest challenges Speranza throws at you.
Conclusion: You’ve Got This!
Look, I know the Bees! quest might seem a bit confusing at first, but trust me, once you know the ropes, it’s actually one of the more straightforward quests in Arc Raiders. The key is knowing exactly where to go and what to do – which is exactly what I’ve laid out for you in this guide.
Remember the main points:
- Head to Olive Grove in Blue Gate
- Find the shack southwest of the marker
- Hold the interact button to collect the hive
- Extract successfully with the hive
- Deliver to the trader back at Speranza
Follow these steps, use the tips I’ve shared, and you’ll have this quest completed in no time. And hey, if you do run into trouble, don’t get discouraged – every raider has been there. Just take a breath, review the guide, and give it another shot.
Happy raiding, and I’ll see you out there in the wasteland! And remember – when in doubt, just follow the buzz! 🐝
P.S. If you found this guide helpful, make sure to bookmark it for future reference. I’m always updating my guides with new tips and tricks as I discover them, and I’d hate for you to miss out on any game-changing strategies. See you in Speranza