Hey there, fellow ARC Raiders! If you’re anything like me, you’ve probably been scratching your head trying to figure out where exactly that darn valve is for the Switching the Supply quest. I spent way too much time wandering around the Spaceport map like a headless chicken before I finally nailed it down. Let me walk you through exactly how to complete this quest so you can get your rewards and move on to bigger and better things.
What is the Switching the Supply Quest?
Before we dive into the nitty-gritty, let me give you the lowdown on what this quest is all about. Switching the Supply is one of Celeste’s quests in ARC Raiders, and honestly, it’s pretty straightforward once you know where to look. The basic gist is that something’s gross about the water around here (Celeste’s words, not mine!), and we need to head into the Spaceport tunnels to turn a valve and switch up the water supply.
When I first picked up this quest from Celeste back in Speranza, I thought it would be a piece of cake. Boy, was I wrong! The Spaceport map is huge, and finding those tunnels can be like trying to find a needle in a haystack if you don’t know what you’re looking for.
Preparing for the Mission
Before you even think about heading to the Spaceport, let me share some pro tips I learned the hard way. First off, you don’t need to extract with any specific items to complete this quest. That’s actually pretty great news because it means you can run a free loadout without worrying about losing your precious gear.
Trust me on this one – the Spaceport is no joke. It’s one of the most open maps in the game, and you’ll find enemy Raiders positioned on top of buildings and towers with sniper rifles that can take you out in just two shots. There’s little to no cover in most areas, so you’ll need to be extra cautious.
I’d recommend bringing some smoke grenades if you have them. They’re a lifesaver when you need to cover your location while you regain some health and shield. And seriously, don’t be a hero like I was on my first attempt – bring that free loadout!
Finding the Tunnels Under Spaceport
Okay, here’s where the real adventure begins. Your first objective is to find the tunnels located under the Spaceport. Now, I know this sounds simple, but when you’re actually in the game, it can be pretty confusing.
There are multiple ways to enter the tunnels, and they’re located all along the center of the map. But let me save you some time and tell you about the most efficient entrance – the one that’s closest to your next objective.
You’ll want to make your way to the center of the map and look for the Spaceport Launch Towers. Right in front of these towers, you’ll see a large hole in the ground where the tunnel’s upper surface has caved in. It’s not too hard to spot once you know it’s there, but I definitely walked past it a few times before I realized what I was looking for.
When you’re approaching the area, you’ll notice the Spaceport tower will be to your left. Use that collapsed cement to climb down into the tunnel system below. And hey, while you’re making your way there, keep an eye out for those sniper Raiders I mentioned earlier. They’re not messing around!
Navigating the Tunnel System
Once you’re down in the tunnels, take a moment to breathe. The good news is that you’re actually pretty safe from the large and scary ARC enemies that roam around above ground. The tunnels stretch out quite a bit, so don’t worry too much about where you entered from – your main focus should just be getting to that valve.
Now, here’s where things can get a bit tricky if you don’t have clear directions. I’ve seen different guides give slightly different instructions, so let me give you the most comprehensive directions based on what worked for me.
As soon as you enter the tunnels using the collapsed cement entrance, you’ll want to circle around behind the northeastern piece of collapsed concrete. The valve you’re looking for is actually surprisingly close to where you dropped down – I can’t tell you how many times I wandered too far into the tunnels before realizing I had basically passed it already!
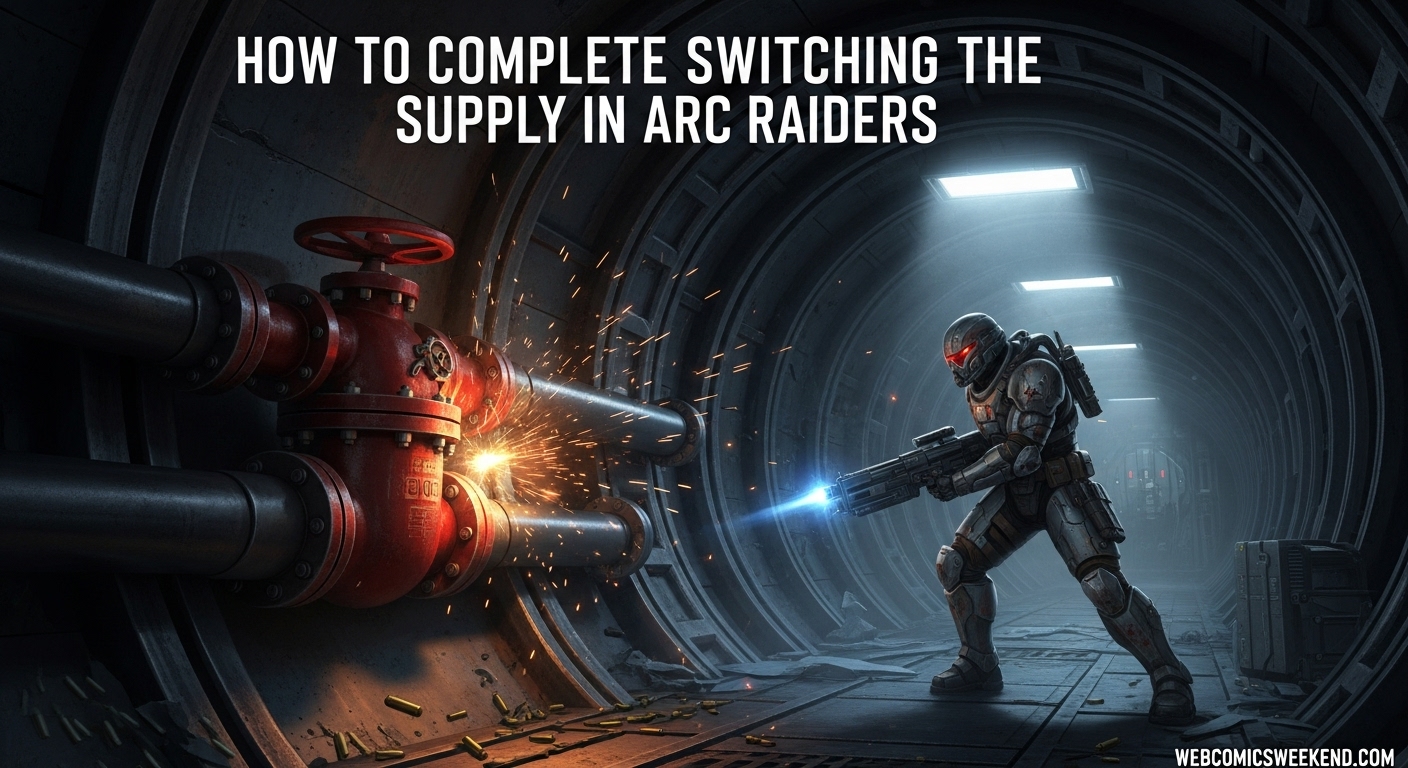
Look for a red valve on a pipe against the right wall. It’s highlighted by a gas lamp, so it’s not too hard to spot once you’re in the right area. Some guides say to face north-west and head up the dark corridor, while others suggest going to the west side of the tunnel and looking for collapsed debris, then heading through a gap on the right.
Honestly, all these directions are basically pointing to the same spot. The key is to not wander too far from your entrance point. The valve is much closer than you’d think!
Turning the Valve and Completing the Quest
When you spot that red valve, you’ll know you’re in the right place. Simply walk up to it and interact with it to switch the water supply. And just like that, the main part of the quest is complete!
I remember feeling a mix of relief and accomplishment when I finally turned that valve. After all the time I spent wandering around, it was almost anticlimactic how simple the final step was. But hey, I’ll take an easy win any day!
Now, here’s something important to keep in mind – you don’t need to extract with anything specific to complete this quest. That means you’re free to loot the area or extract at your leisure. And let me tell you, there’s plenty of stuff to loot while you’re down in those tunnels. I found some pretty decent gear and resources during my time down there.
When you’re ready to head back, you can either leave the way you came or find the nearest extraction point. I’d recommend taking a moment to explore the tunnel system a bit more if you have the time – like I said, there’s some good loot to be found, and you’re safe from the ARC threats above.
Quest Rewards
Alright, let’s talk about the good stuff – the rewards! For completing the Switching the Supply quest, you’ll get:
- 3 Synthesized Fuel – This is consistent across all the sources I checked, so you’re definitely getting this
- Blue (Radio Renegade Color) – Some sources mention this cosmetic reward
- Spaceport Trench Tower Key – This key can open up new areas and opportunities in the Spaceport map
I have to admit, I was pretty happy with these rewards, especially that Spaceport Trench Tower Key. It’s always nice to get keys that unlock new areas, and the Synthesized Fuel is always useful for crafting and upgrades.
2026 Common Issues and Troubleshooting
Now, I want to address something that some players have been experiencing. There have been reports of the quest being bugged for some people, where they’re unable to turn the valve even when they’ve found the correct location.
If you run into this issue, don’t panic! You’re not alone, and the developers are apparently working on a fix. In the meantime, you might want to try leaving the area and coming back, or restarting the quest if possible. Sometimes these things just need a little reset to work properly.
I was lucky enough not to encounter this bug myself, but I can imagine how frustrating it would be to find the valve only to have it not work. Just remember that it’s a known issue and keep an eye out for patches.
Tips for Success
Based on my experience completing this quest multiple times (yes, I went back to help friends!), here are some additional tips that might help you out:
- Bring a free loadout – I can’t stress this enough. The Spaceport is dangerous, and there’s no need to risk your good gear.
- Use smoke grenades – These are incredibly useful for covering your approach to the tunnel entrance, especially if there are enemy Raiders nearby.
- Don’t wander too far – The valve is much closer to the entrance than you might think. I wasted so much time exploring deep into the tunnels before realizing I had basically walked right past it.
- Look for the gas lamp – The valve is highlighted by a gas lamp on the wall, making it easier to spot once you’re in the right area.
- Take your time – There’s no rush, and you’re relatively safe from ARC threats in the tunnels. Use this opportunity to explore and loot the area.
What’s Next?
Once you’ve completed the Switching the Supply quest, you’ll be ready to move on to other challenges. If you’re working through Celeste’s quests, you might want to check out “Power Out” or “Armored Transports” next. These quests offer additional rewards and help you progress further in the game.
I found that completing these water-related quests really helped me understand the game’s lore better, plus the rewards are definitely worth the effort. The more quests you complete, the more you’ll unlock and the stronger your character will become.
Final Thoughts
Looking back on my experience with the Switching the Supply quest, I can honestly say that it’s one of those quests that seems complicated at first but is actually quite straightforward once you know what you’re doing. The key is knowing exactly where to look for that tunnel entrance and then not overcomplicating the search for the valve.
I hope this guide helps you complete the quest much faster than I did my first time around. Remember to stay safe out there, use those smoke grenades, and don’t be afraid to run a free loadout. The Spaceport can be tough, but with the right approach, you’ll be turning that valve and collecting your rewards in no time.
Happy raiding, and I’ll see you out there in the world of ARC Raiders!
FAQ
How do I start the Switching the Supply quest?
You can start the Switching the Supply quest by speaking with Celeste in Speranza. She’ll give you the quest details and objectives.
Do I need to extract with anything to complete this quest?
No, you don’t need to extract with any specific items to complete the Switching the Supply quest. You can complete it simply by finding and turning the valve.
Where exactly is the tunnel entrance in Spaceport?
The tunnel entrance is located in front of the Spaceport Launch Towers. Look for a large hole in the ground where the tunnel surface has caved in. The Spaceport tower will be to your left when you’re facing the entrance.
What should I do if the valve won’t turn?
If you’re unable to turn the valve, you might be experiencing a known bug. Try leaving the area and coming back, or restarting the quest. The developers are working on a fix for this issue.
What rewards do I get for completing this quest?
You’ll receive 3 Synthesized Fuel, a Blue (Radio Renegade Color) cosmetic item, and a Spaceport Trench Tower Key for completing the Switching the Supply quest.
Is the Spaceport map dangerous for this quest?
Yes, the Spaceport is one of the more dangerous maps due to its open layout and enemy Raiders with sniper rifles. It’s recommended to use a free loadout and bring smoke grenades for cover.
Can I complete this quest solo?
Absolutely! The Switching the Supply quest can be completed solo. In fact, the tunnels provide safety from ARC threats, making it easier to complete alone.
How long does it take to complete this quest?
Once you know where to go, the quest can be completed in just a few minutes. The main time investment is finding the tunnel entrance and valve location for the first time.
Want more ARC Raiders guides and tips? Check out our other articles for comprehensive walkthroughs and strategies to help you dominate in the world of ARC Raiders. Don’t forget to bookmark this page for future reference – you never know when you might need to come back for a quick refresher!