Let me tell you something – when I first stumbled upon the “Our Presence Up There” quest in ARC Raiders, I thought it would be just another run-of-the-mill mission. Boy, was I wrong! This quest might seem simple on the surface, but there are some crucial details you need to know to complete it efficiently. I’ve spent hours perfecting this run, and I’m here to share everything I’ve learned so you can knock this out without the headaches I went through.
What Is Our Presence Up There?
Our Presence Up There is one of those quests that looks deceptively easy but can trip you up if you’re not prepared. From what I’ve gathered, this quest comes from either Shani or Celeste (there seems to be some debate in the community about who exactly gives this quest – I’ve seen conflicting information, but the mechanics remain the same regardless). The quest sends you to the Pattern House in Dam Battlegrounds to restore power and install either an antenna or something called “Athena” on the roof – again, sources vary on this detail, but the process is identical.
The real kicker? This is a “one round” quest, meaning you need to complete all three objectives in a single deployment. If you don’t finish that final step before extracting or getting eliminated, you’ll have to start all over again on your next run. Trust me, I learned this the hard way after getting cocky and thinking I could split it across multiple runs.
Quest Objectives Breakdown
Let me break down exactly what you need to accomplish:
| Objective | Location | Required Action |
|---|---|---|
| Visit the Pattern House | Dam Battlegrounds, north/northeast side | Enter the residential building |
| Find and interact with Power Switch | Ground floor, dark room beside stairs | Flip the wall-mounted power switch |
| Complete antenna installation | Rooftop, southern edge | Interact with yellow console |
Getting to the Pattern House
Alright, here’s where things get interesting. The Pattern House is located in the northern part of Dam Battlegrounds – some sources say northeast, others say north, but everyone agrees it’s in the general northern area. I’ve found it’s typically northwest of the Power Generation Complex and near the North Complex Elevator and West Broken Bridge.
When I first attempted this, I spawned on the southern side of the map, and let me tell you – that was a mistake. The trek from south to north is brutal, filled with ARC patrols and plenty of opportunities to get yourself killed. If you’re lucky enough to get a northern or central spawn, you’re in much better shape.
Pro tip: Before you even deploy, pull up your map and mark the Pattern House location. This will save you precious time and help you navigate more efficiently once you’re in the game.
The area around the Pattern House is heavily guarded by ARC forces, so you’ll want to move carefully from cover to cover. I’ve found that sticking to the edges of the map and using natural terrain features for concealment works much better than trying to sprint across open areas. Bring your best weapons and make sure you have plenty of ammo – you’ll likely need it.
Inside the Pattern House
Once you’ve successfully reached the Pattern House (congratulations, by the way – that’s often the hardest part!), it’s time to head inside. The building has multiple entrances, but I’ve found that entering from the west side works best. You don’t need any special keys to get in, which is a relief.
When you step inside, take a moment to get your bearings. You’re looking for the main staircase – it’s pretty hard to miss. Once you’ve located the stairs, you’ll notice a small, dark room adjacent to them. This is where you’ll find the power switch.
I remember my first time doing this quest – I spent way too long searching every room in the building before realizing the power switch was literally right next to the stairs in that side room. The switch is wall-mounted and should be clearly labeled for power control. Just interact with it to flip the switch and bring the building’s systems online.
Getting to the Roof
Now here’s a crucial tip that saved me tons of frustration: don’t take the stairs! I made this mistake on my first attempt and ended up running around the top floor like an idiot, wondering where the roof access was. The stairs will get you to the highest floor, but they don’t connect to the roof.
Instead, look for the zipline near the staircase area. This is your ticket to the rooftop. The zipline is the intended route, and it’s much faster and safer than trying to climb exterior ladders or find alternative routes up.
When I first used the zipline, I was worried it might drop me in a vulnerable position, but it actually places you in a pretty good spot on the roof. Just make sure you’re ready to move quickly once you land, as the roof can sometimes have ARC presence.
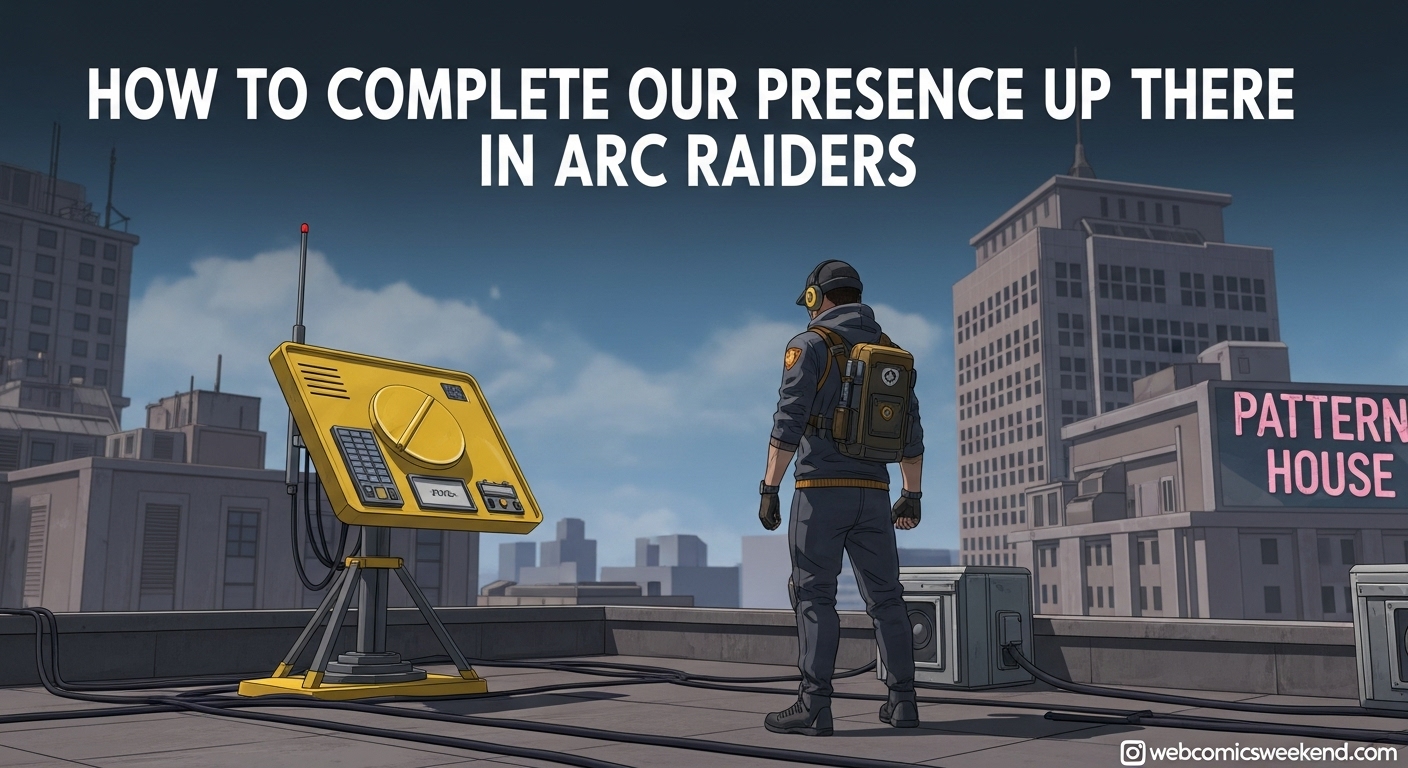
Completing the Antenna Installation
Once you’re on the roof, head toward the southern edge where you’ll find the antenna assembly. Look for a yellow console next to the antenna – it should be pretty noticeable, especially if you’re playing during daytime in the game.
I’ve found that the console glows yellow, making it easier to spot even in darker conditions. Simply approach the console and interact with it to complete the installation process. Some sources call this installing “Athena” while others refer to it as an antenna installation, but regardless of what it’s called, the interaction is the same.
The great thing about this quest is that once you’ve completed the antenna installation, you’re done! You don’t need to extract successfully to get credit for completing the quest. This means you can focus on getting the objectives done and then extract however you can, or even let yourself get eliminated if you’re in a tight spot.
Rewards for Completion
Now, here’s where things get a bit confusing, and I want to be transparent with you about what I’ve found. Different sources report different rewards for completing this quest:
Some sources (like Destructoid) claim you’ll receive:
- 1x Buried City Town Hall Key
- 1x Raider Hatch Key
- 1x Jolt Mine
Other sources (like Sportskeeda) suggest you’ll get:
- Silencer 1 Recipe
- 14,000 XP
From my experience, and considering how recently the game has been updated, I suspect the rewards may have changed with patches or may vary based on your progression in the game. The Town Hall Key and Raider Hatch Key seem more consistent with the game’s reward structure, but I’d recommend being prepared for either possibility.
Tips and Tricks I’ve Learned
After running this quest multiple times, I’ve picked up some strategies that make it much easier:
1. Time Your Deployment: Try to deploy during off-peak hours when there are fewer players. This reduces the chance of running into hostile players while you’re focused on completing the objectives.
2. Gear Appropriately: Since you’ll be facing ARC patrols, bring weapons that are effective against them. I’ve found that assault rifles and SMGs work well for the medium-range engagements you’ll typically face.
3. Use Cover Effectively: The journey to the Pattern House is the most dangerous part. Use buildings, terrain features, and any available cover to move stealthily. I’ve found that crouch-walking between cover points helps avoid detection.
4. Know Your Exits: Before you even start the quest, identify potential extraction points. This way, if things go south after completing the objectives, you know where to head.
5. Bring a Team: While this quest can be completed solo, having a team makes it much easier. You can watch each other’s backs and divide attention between threats.
2026 Common Mistakes to Avoid
I’ve made plenty of mistakes while learning this quest, and I want to help you avoid them:
Don’t Split It Across Runs: I can’t stress this enough – this is a one-round quest. If you complete one or two objectives but don’t finish the third before the round ends, you’ll lose all progress and have to start over.
Don’t Take the Stairs to the Roof: I mentioned this earlier, but it’s worth repeating. The stairs don’t lead to the roof access. Use the zipline instead.
Don’t Rush the Approach: It’s tempting to sprint straight to the Pattern House, but this will likely get you killed. Take your time, use cover, and engage ARC patrols strategically.
Don’t Forget to Mark the Location: Before you deploy, mark the Pattern House on your map. This simple step will save you time and reduce confusion once you’re in the game.
My Personal Experience
When I first attempted this quest, I was frustrated beyond belief. I spawned on the complete opposite side of the map, fought my way through countless ARC patrols, finally reached the Pattern House, only to get eliminated by a sniper while trying to figure out how to get to the roof. I was ready to give up on the quest entirely.
But then I took a step back, did some research, and approached it more strategically. On my second attempt, I got a much better spawn, moved carefully using cover, found the power switch quickly, used the zipline to reach the roof, and completed the antenna installation without any issues. The feeling of satisfaction when that final objective popped up was incredible.
What I love about this quest is that it teaches you important lessons about ARC Raiders – the importance of map knowledge, the value of patience and strategy over brute force, and the satisfaction of overcoming challenges through preparation and skill.
Frequently Asked Questions
Is Our Presence Up There a difficult quest?
Honestly, it’s one of the easier quests in ARC Raiders once you know what you’re doing. The main challenge is reaching the Pattern House safely, especially if you get a bad spawn location.
Do I need to extract successfully to complete the quest?
No! This is one of the best parts about this quest. Once you’ve completed all three objectives, you’re done. You don’t need to survive the extraction to get credit for completion.
Can I complete this quest solo?
Absolutely! While having a team makes it easier, I’ve completed this quest multiple times solo. It just requires more caution and better situational awareness.
What happens if I die after completing some objectives?
Since this is a one-round quest, if you die or the round ends before you complete all three objectives, you’ll lose all progress and have to start over on your next deployment.
Are the rewards worth the effort?
In my opinion, yes. Whether you get the keys and Jolt Mine or the Silencer recipe and XP, the rewards are useful for your progression in the game. Plus, completing quests like this helps you learn the maps and improve your overall gameplay skills.
Final Thoughts
Our Presence Up There might seem like just another quest in ARC Raiders, but it’s actually a great introduction to the game’s quest mechanics and a good way to familiarize yourself with the Dam Battlegrounds map. The skills you learn completing this quest – map navigation, tactical movement, objective prioritization – will serve you well throughout your ARC Raiders journey.
I hope this guide helps you complete the quest more easily than I did my first time around. Remember to be patient, use cover, and don’t get discouraged if you don’t succeed on your first attempt. With practice and the right approach, you’ll have this quest completed in no time.
Good luck out there, Raider! And don’t forget to bookmark this guide for future reference – you never know when you might need to help a squadmate with this quest or refresh your memory on the specifics.
Looking for more ARC Raiders guides and tips? Check out our other articles on quest walkthroughs, weapon guides, and map strategies to become the ultimate Raider!