Let me tell you something – when I first got the Celeste’s Journal quest in ARC Raiders, I thought it would be a simple fetch mission. Boy, was I wrong! After spending hours getting my butt kicked by ARC patrols and losing journals to failed extractions, I finally figured out the perfect strategy. Today, I’m sharing everything I’ve learned so you can complete this quest without the headaches I went through.
What Is Celeste’s Journal Quest All About?
So here’s the deal – Celeste is one of the few traders in Speranza who actually gives a damn about humanity’s fight against the ARC machines. Most traders are just looking out for themselves, but Celeste’s different. She’s been sending us on missions that actually help push back against the mechanical threat. But after you’ve done a few quests for her, she finally asks for something personal – her lost journals.
The quest itself seems straightforward: find two journals she left behind in the Dam Battlegrounds area. But I’m telling you right now, this quest is deceptively challenging. You need to travel across the entire map, avoid increasingly aggressive ARC patrols, manage your inventory space, and successfully extract with both journals. And the worst part? If you mess up and get knocked out, you have to start completely over in the next raid.
Why This Quest Is Trickier Than It Looks?
Before we dive into the locations, let me break down why so many players struggle with this quest:
- Massive Distance: The two journals are on opposite ends of Dam Battlegrounds
- Time Pressure: You only have 30 minutes per raid, and traveling takes time
- Inventory Management: The journals don’t stack, so you need two free slots
- Extraction Risk: You have to extract with both journals, which means carrying them through dangerous areas
- ARC Patrols: The longer you take, the more ARC machines spawn
I learned this the hard way during my first attempt. I grabbed the first journal, feeling all proud of myself, only to get ambushed by three Leapers on my way to the second location. Lost everything and had to start over. Not fun!
Preparation: Setting Yourself Up for Success
Look, I’m not going to sugarcoat this – going into this quest unprepared is asking for failure. Here’s exactly what I recommend bringing:
Essential Loadout Items
| Item Type | Recommendation | Why It’s Crucial |
|---|---|---|
| Primary Weapon | Assault Rifle or LMG | Good balance of damage and ammo capacity |
| Secondary Weapon | Shotgun or SMG | Close-quarters defense against Leapers |
| Augment | Blue Looter Augment | Gives you two safe pockets – absolute lifesaver |
| Utility Items | Adrenaline Shots | Speed boost for quick travel between locations |
| Special Item | Raider Hatch Key | Alternative extraction method if elevators are compromised |
Inventory Management Strategy
Here’s something I wish someone had told me earlier: clear out your inventory before starting this quest. The journals take up two separate slots and don’t stack, so you need space. I recommend:
- Bringing only essential ammo (maybe 200 rounds for primary, 50 for secondary)
- Carrying minimal healing items (2-3 medkits max)
- Leaving space for both journals plus one extra slot for any emergency loot
When to Attempt This Quest?
Timing is everything, folks. I’ve found this quest is much easier when:
- Dynamic Map Conditions are inactive – Dam Battlegrounds is the easiest map without extra complications
- You’re playing with a squad – Having teammates watch your back makes a huge difference
- You spawn on the south side – Makes reaching the South Swamp Outpost first much easier
- Early in the day – Fewer players mean less competition for extraction points
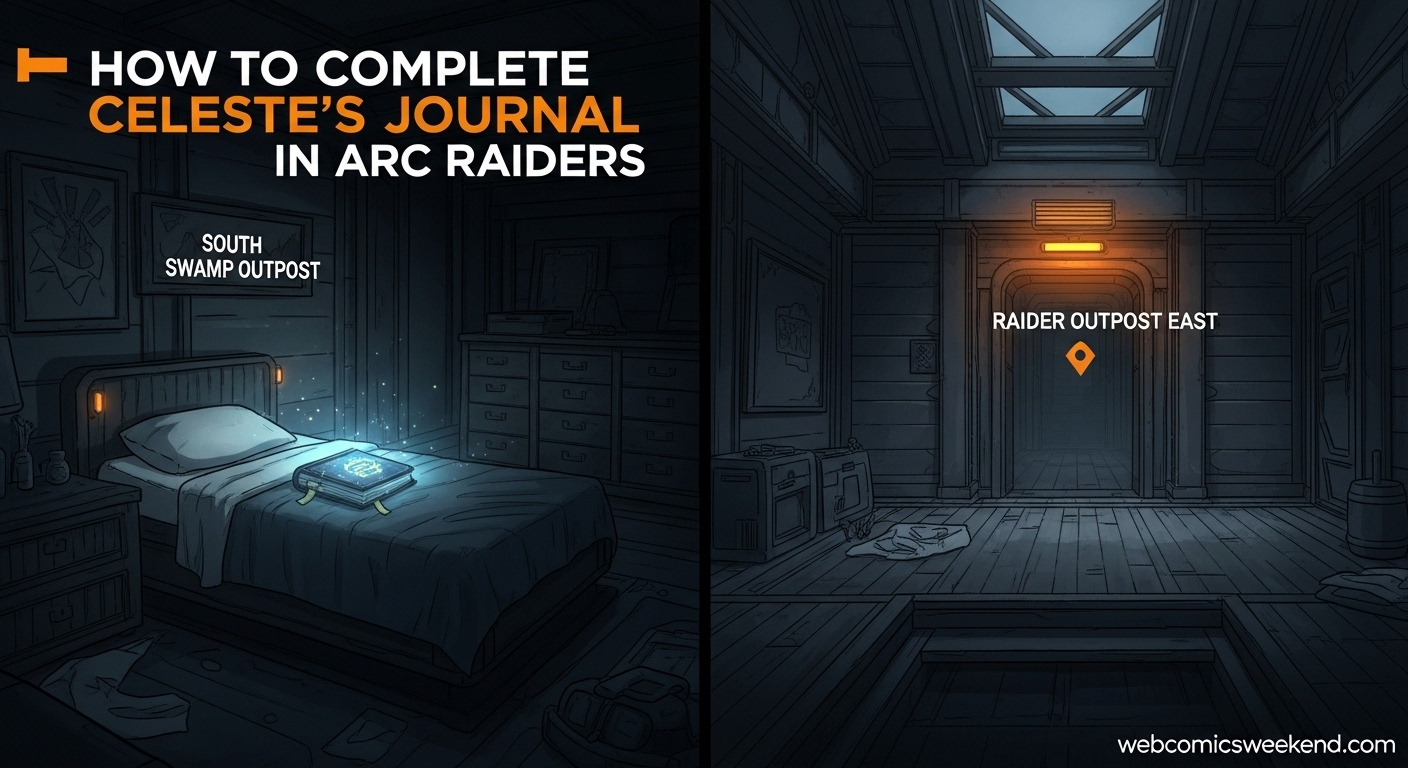
South Swamp Outpost Journal Location
Alright, let’s get to the good stuff – the actual locations. I’m starting with the South Swamp Outpost because it’s usually easier to reach first, especially if you spawn on the southern side of the map.
Finding the South Swamp Outpost
The South Swamp Outpost is located in the southwestern portion of Dam Battlegrounds, directly west of the Water Treatment Control building. If you’re looking at your map, it’s pretty easy to spot – it’s one of the more intact buildings in the swamp area.
Pro tip: When I’m heading there, I stick to the tree lines and avoid open areas. Leapers love to spawn near the Water Treatment Control, and getting detected early can ruin your whole run.
Inside the Outpost
Once you reach the South Swamp Outpost, you’ll see a collapsed structure. Don’t worry, it’s still accessible. Head inside and you’ll find yourself in a small room with a bed. The journal is sitting right at the foot of this bed, almost like it’s about to fall off.
Here’s what you’re looking for:
- Visual cue: The journal has a distinct yellow glow
- Interaction prompt: “Search for journals” will appear when you’re close enough
- Location: Literally at the foot of the bed, can’t miss it if you’re in the right room
My Personal Experience
I remember my first time finding this location – I spent 20 minutes searching the wrong building because I didn’t realize there were multiple structures in the area. The actual outpost is the one with the collapsed roof but still-standing walls. When you see the bed inside, you know you’re in the right place.
Important: Make sure you have inventory space before picking this up! I’ve seen so many players (including myself) get excited and grab it, only to realize they can’t pick up the second journal later.
Raider Outpost East (Northern Outpost) Location
Now for the more confusing part – the so-called “Northern Outpost.” The quest description says to go to the “northern outpost overlooking the Red Lakes,” but here’s the thing: there’s no location actually called “northern outpost” on the map. This threw me for a loop my first few attempts.
The Real Location: Raider Outpost East
What you’re actually looking for is Raider Outpost East. This is located at the very top of the Dam Battlegrounds map, just above the Power Generation Complex. If you’re looking at the Red Lakes (which are on the east side of the map), Raider Outpost East is tucked behind the corner of the Power Generation Complex to the north.
Navigation Tips
Getting to Raider Outpost East can be tricky because:
- It’s a long trek from anywhere on the map
- The Power Generation Complex area is usually crawling with ARC patrols
- There are often other players competing for the same area
Here’s how I approach it:
- Plan your route: Use the terrain for cover – stick to rocks and buildings
- Time your movement: Watch for patrol patterns and move when it’s clear
- Have escape routes: Always know where you can duck for cover if things go south
Inside Raider Outpost East
Once you reach Raider Outpost East, head for the tallest building in the outpost area. You’ll notice it has a big circular part with a small hallway attached. That hallway is where you’ll find the journal.
The journal is located:
- On a small cot/bed in the hallway
- Same yellow glow as the first journal
- Same interaction prompt: “Search for journals”
Common Mistakes to Avoid Here
I’ve seen so many players make the same mistakes I did:
- Searching the wrong building: There are multiple structures, but you want the tallest one with the circular design
- Missing the hallway: The journal isn’t in the main circular room – it’s in the attached hallway
- Getting greedy: Don’t stick around to loot other items once you have the journal – extract ASAP
Extraction Strategy: The Make-or-Break Moment
Look, I’m not going to lie – getting both journals is only half the battle. Extracting successfully with both is where most players fail. Here’s my battle-tested extraction strategy.
Timing Your Extraction
The 30-minute raid timer is your biggest enemy here. By the time you’ve traveled to both locations and collected both journals, you’ve probably used up 15-20 minutes. That means ARC patrols are at their most aggressive, and other players are getting desperate to extract.
My rule of thumb: If you have both journals and there’s less than 10 minutes left, extract immediately. Don’t try for extra loot, don’t explore – just get to the nearest extraction point.
Choosing Your Extraction Point
Dam Battlegrounds has several extraction options:
| Extraction Type | Best For | Risk Level |
|---|---|---|
| Elevator | Standard extraction | Medium (often camped) |
| Raider Hatch | Quick escape | Low (if you have the key) |
| Emergency Exit | Last resort | High (usually heavily guarded) |
My recommendation: If you have a Raider Hatch Key, use it. It’s the fastest and safest way out. If not, head to the nearest elevator but approach with caution.
The Final Approach
When you’re heading to extract with both journals:
- Move stealthily: Crouch and use cover
- Listen for other players: Footsteps and gunshots mean trouble
- Have your weapon ready: Don’t get caught with your pants down
- Check the extraction point: Look for campers before approaching
I learned this lesson the hard way – once got within 50 feet of the elevator only to get ambushed by two players waiting for exactly someone like me carrying valuable quest items.
Quest Rewards: Is It Worth It?
After all this trouble, you’re probably wondering what you actually get for completing Celeste’s Journal quest. Let me break it down:
Reward Breakdown
When you successfully extract with both journals and return to Celeste in Speranza, you’ll receive:
- 1x Magnetic Accelerator: This is actually pretty valuable for crafting advanced weapons
- 3x Heavy Gun Parts: Always useful for weapon maintenance and upgrades
- 1x Exodus Module: Rare component used in high-level crafting recipes
My Personal Take on the Rewards
Honestly? The rewards are decent but not game-changing. The real value, in my opinion, is:
- Completing Celeste’s questline: Opens up more advanced quests from her
- Experience with the map: You’ll know Dam Battlegrounds like the back of your hand
- Prestige: Not many players complete this quest solo on their first try
If you’re looking for purely material rewards, there are probably more efficient ways to spend your time. But if you want to progress Celeste’s story and prove you can handle tough extraction quests, this is definitely worth doing.
Advanced Tips and Tricks
After completing this quest multiple times (both solo and with squads), I’ve picked up some advanced strategies that really help:
Solo Play Strategies
If you’re attempting this solo (like I did my first time), here are some crucial tips:
- Play at off-peak hours: Fewer players mean less competition and danger
- Use stealth aggressively: I can’t stress this enough – avoid fights whenever possible
- Plan your route in advance: Know exactly where you’re going before you drop in
- Consider the blue looter augment: Those two safe pockets saved my butt countless times
Squad Play Advantages
Playing with a squad makes this quest dramatically easier:
- Divide and conquer: One player can head to each location simultaneously
- Cover fire: Teammates can watch your back while you grab the journals
- Shared resources: If one player goes down, others can recover their gear
- Distraction tactics: Teammates can draw away ARC patrols while you extract
Environmental Awareness
Dam Battlegrounds has its own rhythm and patterns. Here’s what I’ve learned:
- Water areas slow you down: Avoid swimming unless absolutely necessary
- Buildings provide cover: Use them to break line of sight with patrols
- Elevation matters: High ground gives you better visibility and escape options
- Sound travels: Gunshots and explosions attract both ARC and other players
Common Mistakes and How to Avoid Them
I’ve made pretty much every mistake possible with this quest. Let me save you some frustration by sharing what NOT to do:
Mistake #1: Not Checking Inventory Space
This is probably the most common mistake. Players get excited, grab the first journal, then realize they can’t pick up the second one.
How to avoid: Before you even start the quest, make sure you have at least two empty inventory slots. I actually keep three empty just to be safe.
Mistake #2: Ignoring the Timer
I’ve seen so many players take their time exploring and looting, only to run out of time and fail to extract.
How to avoid: Keep an eye on your timer. If you have both journals and you’re under 10 minutes, extract immediately. The extra loot isn’t worth losing the quest progress.
Mistake #3: Fighting Unnecessary Battles
Every fight you get into risks attracting more ARC patrols and other players. I used to try to clear every area I went through, but that’s just asking for trouble.
How to avoid: Stealth is your best friend. Avoid fights whenever possible. If you can sneak past a patrol, do it. Save your ammo for when you really need it.
Mistake #4: Not Having an Extraction Plan
You’d be surprised how many players grab both journals and then wander around aimlessly trying to find an extraction point.
How to avoid: Before you even grab the first journal, identify the nearest extraction points and plan your route. Know exactly where you’re going once you have both journals.
FAQ: Everything Else You Need to Know
I get a lot of questions about this quest, so let me answer the most common ones:
Do I need to complete this in one raid?
Yes, absolutely. Both journals must be collected and extracted in the same raid. If you get knocked out or fail to extract, you’ll need to start completely over in the next raid.
Can I do this quest with friends?
Definitely! In fact, I recommend it. Having teammates makes this quest much easier. You can split up to grab both journals faster, and having backup during extraction is invaluable.
What happens if I die after getting one journal?
Tough luck, my friend. If you get knocked out after grabbing one journal, you’ll lose it and need to collect both journals again in your next raid. This is why the blue looter augment with safe pockets is so valuable.
Are the journals always in the same place?
Yes, they are. The South Swamp Outpost journal is always at the foot of the bed in the collapsed structure, and the Raider Outpost East journal is always on the cot in the hallway. The locations don’t change.
Can I complete this quest on any map?
No. Celeste’s Journal quest specifically takes place on Dam Battlegrounds. You won’t find these journals on other maps.
What level should I be before attempting this?
I’d recommend at least level 10-15. You’ll want decent gear and some experience with the game’s mechanics before tackling this quest. That said, I’ve seen skilled players complete it at lower levels.
Do the journals take up inventory space?
Yes, and this is crucial. The journals take up two separate inventory slots and don’t stack. Make sure you have space before you start grabbing them.
Final Thoughts: Is This Quest Worth Your Time?
After everything I’ve been through with this quest, you might be wondering if it’s actually worth the effort. Here’s my honest take:
For completionists: Absolutely worth it. If you’re like me and want to complete every quest and max out your relationships with all traders, this is a must-do.
For casual players: Maybe skip it unless you really need the specific rewards. There are easier ways to get similar materials.
For achievement hunters: Definitely do it. Completing Celeste’s Journal is often tied to achievements and can unlock additional content.
For lore enthusiasts: I’d say it’s essential. Celeste’s journals contain some interesting backstory about the world and the ARC threat.
Personally, I’m glad I stuck with it and completed this quest. Yeah, it was frustrating at times, but the sense of accomplishment I felt when I finally extracted with both journals was incredible. Plus, the experience I gained navigating Dam Battlegrounds has made me a much better player overall.
Your Turn to Shine
Alright, now you’ve got all the knowledge I wish I had when I first started this quest. You know the locations, the strategies, the common pitfalls, and exactly how to prepare. The only thing left is for you to go out there and get it done.
Remember:
- Prepare properly: Right loadout, clear inventory, good timing
- Stay stealthy: Avoid unnecessary fights
- Manage your time: Keep an eye on that 30-minute timer
- Extract smart: Don’t get greedy, get out safely
I’d love to hear about your experiences with this quest! Did you find any strategies I missed? Have any horror stories about failed extractions? Drop a comment below and let me know how it went for you.
And hey, if you found this guide helpful, don’t forget to bookmark it for future reference. I update my guides regularly as I discover new strategies and the game evolves.
Happy raiding, and may your extractions always be successful!
Looking for more ARC Raiders guides? Check out our other articles on webcomicsweekend.com for everything from beginner tips to advanced strategies. We’re constantly adding new content to help you dominate the world of ARC Raiders!