Let me tell you something – when I first jumped into ARC Raiders and got the “A First Foothold” quest from Apollo, I had absolutely no idea what I was getting myself into. I mean, who wouldn’t be intimidated when you’re told you need to travel across the entire Blue Gate map to complete four different objectives? After spending countless hours figuring this out (and making plenty of mistakes along the way), I’m here to share everything I’ve learned so you can breeze through this quest like a pro.
What Makes A First Foothold So Special?
Before we dive into the nitty-gritty details, let me explain why this quest is such a big deal in the grand scheme of things. A First Foothold isn’t just another run-of-the-mill mission – it’s basically your introduction to becoming a true infrastructure expert in the Rust Belt. When I completed this quest, I felt like I had finally earned my stripes as someone who could actually make a difference in this post-apocalyptic world.
The quest comes from Apollo, one of the key traders you’ll work with throughout your journey in ARC Raiders. He’s basically the guy responsible for expanding our presence and making sure we Raiders have safe spots to operate from. And let me tell you, after completing this quest, you’ll definitely feel like you’ve contributed something meaningful to the cause.
The Big Picture: Understanding What You’re Getting Into
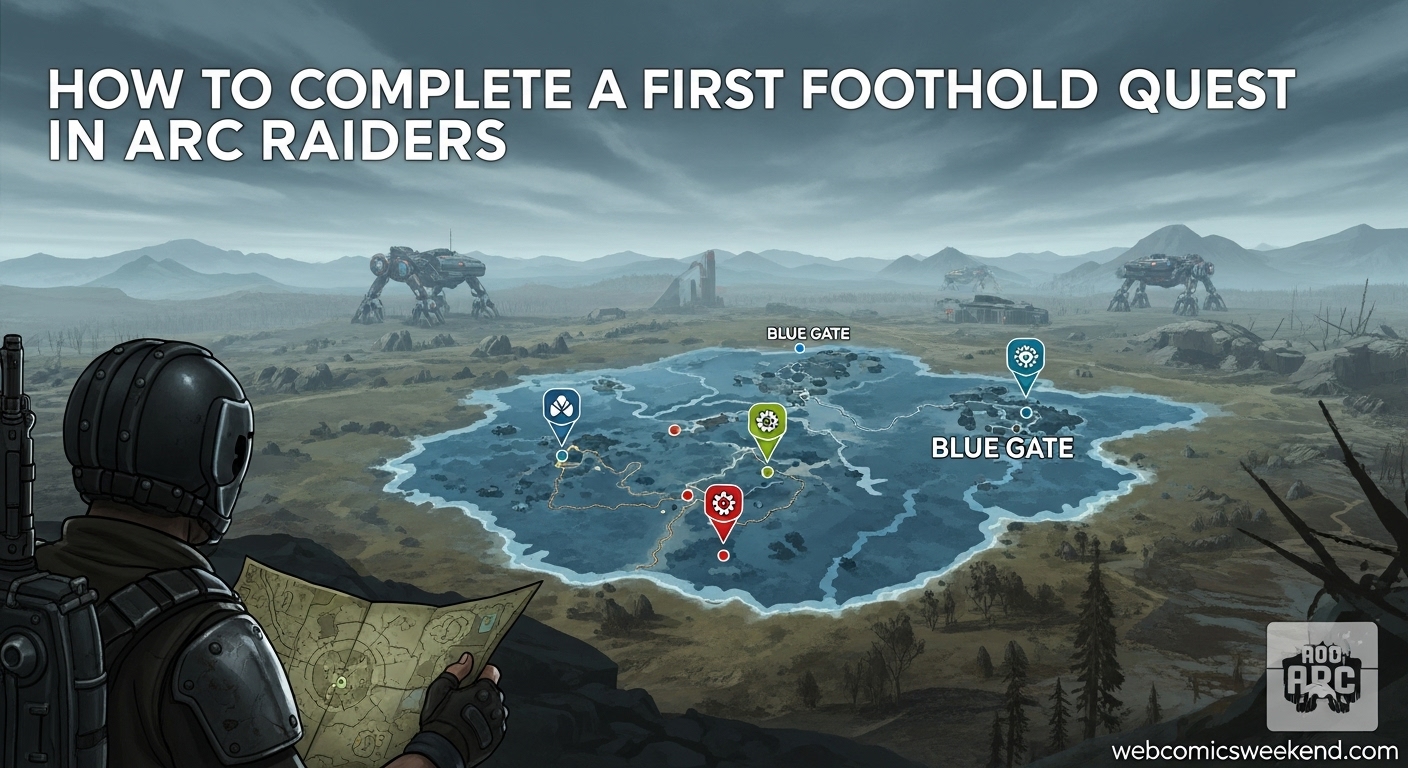
Here’s the deal – A First Foothold sends you to four completely different corners of the Blue Gate map. I’m talking north, south, east, and west – this quest literally has you covering the entire area. At first glance, this might seem overwhelming, but here’s the good news: you don’t have to complete all four objectives in a single run. Thank goodness for that, right?
When I first attempted this quest, I tried to do everything in one go, and let me tell you, that was a mistake. I ended up getting overwhelmed by ARC patrols and other Raiders who weren’t exactly friendly. After learning from my failures, I discovered that taking it one objective at a time is definitely the way to go.
Quick Overview of All Four Objectives
Before we dive into each location, let me give you a quick rundown of what you’ll be doing:
- Stabilize the observation deck near the Ridgeline (Eastern area)
- Enable the comms terminal near the Olive Grove (Southern area)
- Rotate the satellite dishes on the church roof, north of the Data Vault (Northern area)
- Nail down the roof plates on the Raider structure near Trapper’s Glade (Western area)
See what I mean? This quest literally has you going to every corner of the map. But don’t worry – I’m going to walk you through each location step by step.
Objective 1: Stabilize the Observation Deck Near Ridgeline
Alright, let’s start with the first objective on our list. The Ridgeline area is located in the eastern portion of Blue Gate, and honestly, this is probably one of the safer areas you’ll visit during this quest. When I first came here, I was surprised by how relatively quiet it was compared to other parts of the map.
Finding the Exact Location
The observation deck is situated along the very outer rim of the map in the Ridgeline area. If you look at your map, you’ll want to head to the eastern side, just below the Abandoned Housing Project. Trust me, you can’t miss it once you get close – there’s a damaged observation deck with metal plates that look like they’re about to slide off at any moment.
My Personal Experience Here
When I first arrived at this location, I was actually pretty nervous. I had heard stories about other Raiders getting ambushed in this area, but to my surprise, it was relatively peaceful. The observation deck itself is pretty obvious once you’re in the right area – it’s a structure that looks like it’s seen better days, with several metal panels that need securing.
How to Actually Stabilize the Deck
Here’s what you need to do once you find the observation deck:
- Approach the structure carefully – While this area is generally safe, it’s always good to be cautious
- Look for the interaction prompts – You’ll see several points where you can interact to start repairing
- Complete the stabilization process – This usually involves a quick mini-game or simply holding down the interaction button
- Watch for completion confirmation – You’ll get a notification when this objective is complete
One tip I learned the hard way: make sure you’re actually at the right observation deck. There are a few similar-looking structures in the area, but only one will give you the stabilization prompt. If you don’t see the interaction option, you’re probably at the wrong location.
Potential Dangers to Watch Out For
While this area is generally safer than others, I still ran into a few issues during my visits:
- Occasional ARC patrols – They’re not as dense here, but they do show up sometimes
- Other Raiders – Some players might try to ambush you, especially if they see you’re focused on the objective
- Environmental hazards – The structure itself can be a bit unstable, so watch your step
Objective 2: Enable the Comms Terminal Near Olive Grove
Now we’re heading to the southern part of Blue Gate for our second objective. The Olive Grove area is… well, exactly what it sounds like – an area with lots of olive trees. But don’t let the peaceful name fool you; this place can get pretty hectic.
Why This Area Can Be Tricky?
Let me be straight with you – the Olive Grove is one of the more active areas in Blue Gate. It’s a popular farming spot for olives (go figure, right?), which means you’ll likely run into other Raiders here. When I first came to this area, I was surprised by how many other players were just hanging around, farming resources.
Finding the Comms Terminal
The comms terminal is located in the western section of the Olive Grove POI. You’re looking for a yellow computer terminal set up on a makeshift platform. It’s actually pretty distinctive once you know what you’re looking for – the terminal has this bright yellow casing that really stands out against the natural environment.
My Strategy for This Location
Here’s how I approach this objective whenever I need to complete it:
- Scout the area first – I usually take a minute to observe from a distance to see if other Raiders are around
- Time your approach – I try to go when the area seems less populated
- Be friendly if you see others – Sometimes, waving or being non-aggressive can prevent unnecessary conflicts
- Move quickly once you start – The terminal interaction doesn’t take long, so get in and get out
Step-by-Step Terminal Activation
Once you’ve found the terminal, here’s what you need to do:
- Approach the yellow terminal – It’s usually on a raised platform overlooking the highway
- Look for the interaction prompt – It should say something like “Enable Terminal” or “Restore Comms”
- Complete the activation sequence – This is typically just holding down the interaction button
- Wait for confirmation – You’ll get a notification when the comms terminal is successfully enabled
Common Issues I’ve Encountered
During my multiple visits to this location, I’ve run into a few problems that you should be aware of:
- Other players farming Scrappy – This area is popular for training the pet rooster, so expect company
- ARC machines patrolling the highway – The nearby collapsed highway area can have ARC activity
- Terminal sometimes bugging out – If the interaction doesn’t work, try repositioning yourself
Objective 3: Rotate the Satellite Dishes on the Church Roof
This objective takes us to the northern part of Blue Gate, specifically north of the Data Vault area. When I first heard I needed to climb a church roof to mess with satellite dishes, I have to admit, I was pretty intrigued.
The Journey North
The church is located in the northernmost area of the Blue Gate map. It’s actually one of the more remote locations you’ll visit for this quest, which can be both good and bad. On one hand, you’re less likely to run into other players. On the other hand, if something goes wrong, help is far away.
Identifying the Church
You’re looking for an abandoned church with construction equipment scattered around it. What really gives it away are the satellite dishes on the roof – they’re pretty hard to miss once you’re in the right area. When I first found this location, I was struck by how eerie it looked, standing there alone in the northern hills.
My Climbing Strategy
Getting to the satellite dishes requires some climbing, which can be a bit tricky if you’re not prepared. Here’s how I do it:
- Look for the scaffolding – There’s usually construction equipment and scaffolding along the sides of the church
- Plan your route up – I usually scout the best path before starting the climb
- Take it slow – There’s no rush, and falling can mean injury or death
- Watch for weak points – Some parts of the scaffolding might be unstable
Actually Rotating the Dishes
Once you make it to the roof, here’s what you need to do:
- Approach the satellite dishes – They’re usually grouped together on the highest point of the roof
- Look for the interaction prompt – It should say something about rotating or calibrating the dishes
- Complete the rotation – This might involve turning them in a specific direction or just interacting with them
- Confirm completion – You’ll get a notification when this objective is done
What Makes This Location Unique?
In my experience, this location has some interesting characteristics:
- Generally quiet – Being so far north, you’re less likely to encounter other players
- Great views – The church roof offers some pretty spectacular views of the surrounding area
- Potential for snipers – The high vantage point could make you vulnerable to distant attackers
- ARC presence varies – Sometimes it’s completely clear, other times you might encounter patrols
Objective 4: Nail Down the Roof Plates on the Raider Structure
Our final objective takes us to the western part of Blue Gate, near Trapper’s Glade. When I first learned I had to fix a roof as part of this quest, I have to admit, I laughed a little. I mean, who knew being a Raider would involve so much home improvement?
The Western Approach
Trapper’s Glade is located in the western portion of Blue Gate, and let me tell you, this area can be pretty dangerous. It’s known for having a significant ARC presence, including Bombardiers and other nasty machines that you definitely don’t want to mess with unprepared.
Finding the Raider Structure
The Raider structure is located just below the word “Trapper’s” on the map, in a forested area. You’re looking for a broken-down structure with a red and green flag hoisted on top. When I first found this location, I was struck by how… well, broken it looked. The roof definitely needed some work, that’s for sure.
My Stealth Strategy for This Area
Given the high ARC presence in this area, I’ve developed a pretty solid approach for getting this done safely:
- Approach from the north – I find this direction usually has fewer ARC patrols
- Move slowly and quietly – Stealth is your friend here
- Use cover effectively – There are plenty of trees and rocks to hide behind
- Have an escape route planned – Always know where you’re going to run if things go south
The Roof Repair Process
Once you’ve safely reached the structure, here’s how to complete the objective:
- Climb to the roof – There are usually some makeshift stairs or debris you can use to get up
- Look for the loose plates – They’re pretty obvious – metal sheets that look like they’re about to fly away
- Interact to secure them – You’ll get a prompt to nail down or secure the plates
- Complete all necessary repairs – Sometimes there are multiple plates that need securing
Why This Location Can Be the Most Challenging
In my experience, this final objective is often the most difficult for several reasons:
- High ARC density – This area seems to have more ARC activity than the others
- Limited escape routes – The forest can make it hard to get away quickly if you’re spotted
- Other Raiders competing – Since it’s the last objective, many players are here trying to finish the quest
- Complex terrain – The forest and structure can make movement tricky
My General Tips for Completing the Entire Quest
Now that I’ve walked you through each individual objective, let me share some overarching strategies that I’ve learned through trial and error. These tips should help you complete the entire quest more efficiently and safely.
Don’t Try to Do Everything in One Run
I mentioned this earlier, but it’s worth repeating because it’s so important. When I first attempted this quest, I tried to complete all four objectives in a single raid, and it was a disaster. I ended up losing all my gear and making zero progress. Now, I always approach this quest with the mindset that I’ll complete one or two objectives per run.
Loadout Considerations
Your choice of gear can make a huge difference in how smoothly this quest goes. Here’s what I typically bring:
- Light armor – You want mobility over heavy protection since you’ll be doing a lot of traveling
- Mid-range weapons – Versatile enough for close encounters but effective at a distance
- Plenty of healing items – You never know when you’ll run into trouble
- Stealth-oriented equipment – Items that help you avoid detection can be lifesavers
Timing Your Attempts
I’ve found that certain times are better for attempting this quest:
- Early morning or late night – Fewer players online means less competition and conflict
- Weekdays – Generally less crowded than weekends
- After server resets – Sometimes the world feels “fresher” and less chaotic
Working With Other Raiders
While ARC Raiders can be a competitive game, I’ve found that sometimes cooperation is the best strategy:
- Wave at other players – A simple gesture can prevent unnecessary conflicts
- Help each other with ARC – If you see another player fighting ARC, helping them can create a temporary alliance
- Share information – Letting others know about ARC patrol locations can benefit everyone
The Rewards: Is It Worth It?
After completing all four objectives and extracting safely, you’ll be rewarded by Apollo with some pretty useful items. Let me tell you, when I first completed this quest, I was pretty excited about the rewards.
What You’ll Get
Apollo rewards you with a variety of grenades that can be incredibly useful in future raids:
- 3x Shrapnel Grenades – Great for dealing with groups of enemies
- 2x Snap Blast Grenades – Perfect for quick area denial
- 3x Heavy Fuze Grenades – Excellent for taking down tougher ARC machines
Why These Rewards Matter
These grenades might not seem like much at first glance, but let me tell you, they’ve saved my bacon more times than I can count. Having a good supply of different grenade types gives you so many more options when things get hairy out there.
Common Problems and How I Solve Them
Throughout my time completing this quest multiple times (yes, I’ve done it more than once – don’t ask), I’ve run into pretty much every problem you can imagine. Let me share some of the most common issues and how I’ve learned to deal with them.
Problem: Can’t Find the Exact Location
This is probably the most common issue I see players having. The quest descriptions can be pretty vague, and Blue Gate is a big map.
My Solution: I always use the map markers as general guidelines, but I also look for distinctive landmarks. Each location has unique features that give it away once you know what to look for.
Problem: Other Players Keep Interfering
PvP is a reality in ARC Raiders, and sometimes other players just want to ruin your day.
My Solution: I’ve learned to be more aware of my surroundings and to have escape routes planned. Sometimes, changing servers or coming back at a different time can help too.
Problem: ARC Patrols Are Too Dense
Some areas seem to have more ARC activity than others, making it nearly impossible to complete objectives safely.
My Solution: Patience is key here. I sometimes wait for patrols to pass or try to draw them away from the objective area before moving in.
Problem: Interaction Prompts Don’t Appear
There’s nothing more frustrating than finding the right location but not being able to interact with the objective.
My Solution: I’ve found that repositioning myself or logging out and back in can sometimes fix this issue. Also, make sure you’re actually at the correct location – there are often similar-looking structures nearby.
Advanced Strategies for Experienced Raiders
Once you’ve completed this quest a few times and gotten comfortable with the basics, you might want to try some more advanced approaches. Here are some strategies I’ve developed that can help you complete this quest more efficiently.
Speed Running the Quest
If you’re trying to complete this quest as quickly as possible (maybe for an event or just personal challenge), here’s how I do it:
- Plan your route – I map out the most efficient path between all four locations
- Use fast travel points – If available, these can save a ton of time
- Bring minimal gear – Lighter load means faster movement
- Go during off-peak hours – Fewer players means fewer interruptions
Solo vs. Team Approaches
I’ve completed this quest both solo and with a team, and each approach has its advantages:
Solo:
- More stealth options
- No need to coordinate with others
- All rewards go to you
- More challenging but more rewarding
Team:
- Safety in numbers
- Can complete objectives faster
- Can watch each other’s backs
- Need to share rewards
Resource Optimization
If you’re trying to complete this quest while also gathering resources, here’s my approach:
- Plan resource stops – I identify areas along my route where I can gather useful materials
- Balance inventory space – Make sure you have room for both quest items and resources
- Prioritize high-value resources – Focus on materials that are most useful for your progression
Frequently Asked Questions
Based on my experience helping other Raiders with this quest, here are some of the most common questions I get asked:
Do I need to complete the objectives in a specific order?
Nope! One of the great things about this quest is that you can complete the objectives in any order you want. I usually go with whatever’s closest to where I spawn, but you can tackle them however you prefer.
Can I complete multiple objectives in a single run?
Absolutely! While I don’t recommend trying to do all four at once (especially when you’re first learning), completing two or even three objectives in a single run is definitely possible if you’re efficient and lucky.
What happens if I die after completing an objective?
Good news! The objectives save your progress even if you die. So if you complete one objective and then get killed before extracting, you’ll still have credit for that objective when you come back.
Are the rewards worth the effort?
In my opinion, yes. The grenades you get are really useful, and completing this quest opens up other opportunities with Apollo. Plus, there’s a certain satisfaction in knowing you’ve helped establish a foothold in the Blue Gate area.
How long does the entire quest take to complete?
This really depends on your approach. If you’re trying to do one objective per run, it might take you a few days. If you’re efficient and do multiple objectives per run, you could potentially finish it in a single play session.
Final Thoughts from My Experience
After completing the First Foothold quest multiple times and helping countless other Raiders through it, I can honestly say it’s one of the more rewarding quests in ARC Raiders. Yeah, it can be frustrating at times, and yeah, you’ll probably die a few times along the way, but that’s all part of the experience, right?
What I love most about this quest is how it really makes you feel like you’re contributing to something bigger. Every time I stabilize that observation deck or enable that comms terminal, I feel like I’m actually making a difference in the Rust Belt. And isn’t that what being a Raider is all about?
So there you have it – my complete guide to the First Foothold quest in ARC Raiders. I hope this helps you on your journey, and who knows, maybe I’ll see you out there in the Blue Gate area. If you do see me, feel free to wave – I’m always happy to help a fellow Raider in need.
Remember, the Rust Belt is a dangerous place, but with the right knowledge and preparation, there’s nothing we Raiders can’t handle. Good luck out there, and happy raiding!
Want more ARC Raiders guides and tips? Check out our other articles on extraction strategies, the best weapons for beginners, and how to train your Scrappy effectively. And don’t forget to bookmark this page – I’ll be updating it regularly with new tips and strategies as I discover them!