Let me tell you something – when I first started playing ARC Raiders, I thought the biggest threat would be those menacing ARC machines or other players trying to steal my loot. Boy, was I wrong. My real enemy became my own inventory. I can’t count how many times I’ve returned from a successful mission only to stare at my overflowing stash in Speranza, wondering where I’m supposed to put all this stuff.
If you’re anything like me, you probably have a bit of a hoarder mentality when it comes to loot. That rare weapon? Gotta keep it. Those crafting materials? Might need them later. That deflated soccer ball? Well… you never know, right? But here’s the thing – running out of inventory space in ARC Raiders isn’t just annoying, it’s actively holding you back from enjoying the game to its fullest.
After spending countless hours experimenting with different strategies and learning from my mistakes (and trust me, I made plenty), I’ve figured out the best ways to increase your inventory size in ARC Raiders. I’m going to share everything I’ve learned so you can avoid the inventory nightmares I went through.
Understanding ARC Raiders’ Inventory System
Before we dive into how to expand your inventory, let me break down how the system actually works. When I first started, I was confused about the different types of storage, and I bet you might be too.
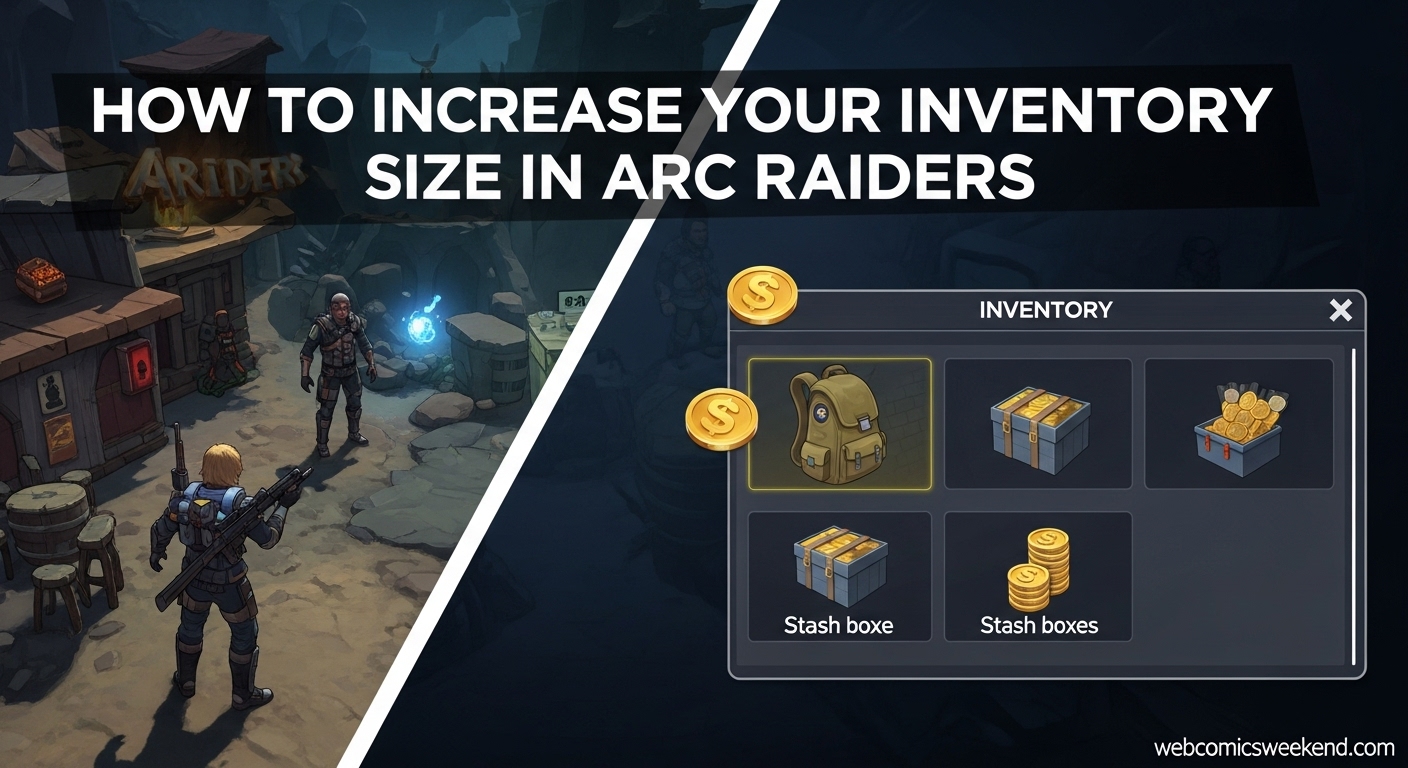
In ARC Raiders, you have two main types of inventory:
- Your Personal Backpack Inventory – This is what you carry with you on missions topside. It’s limited and determines how much loot you can grab before you need to head back to Speranza.
- Your Stash Inventory – This is your permanent storage back at base in Speranza. This is where you keep all the items you’re not currently using, and it can get pretty crowded pretty quickly.
When I first began playing, I started with just 64 stash slots. Let me tell you, that sounds like a lot until you’ve been on a few successful missions and your stash is bursting at the seams with weapons, crafting materials, and all sorts of random junk you’ve collected along the way.
How to Expand Your Stash Inventory?
Alright, let’s get to the good stuff. Expanding your stash is probably the most important thing you can do to improve your inventory situation. Here’s how I do it:
The Coin Method (My Go-To Strategy)
The simplest way to expand your stash is by using coins. Here’s the step-by-step process I follow:
- Head to the main menu and open up your inventory screen
- Look for the “Expand” button – it’s usually located at the top of your item slots, between the Loadout and Stash labels
- Click it and get ready to spend some coins
Now, let me break down the costs because this is where things get interesting:
- First expansion: 5,000 coins for 24 additional slots (bringing you to 88 total)
- Second expansion: 10,000 coins for even more slots
- Third expansion: 15,000 coins
- And so on…
Each subsequent expansion costs 5,000 more coins than the previous one. I won’t lie – this can get expensive pretty quickly. When I first started expanding my stash, I was shocked at how quickly the costs added up.
But here’s the thing – it’s worth it. The maximum stash size you can reach is 280 slots, and let me tell you, once you get there, you’ll feel like you have unlimited space compared to where you started.
Making Coins for Stash Expansion
Since expanding your stash costs a lot of coins, you’re probably wondering how I manage to make enough money. Here are my favorite methods:
- Complete quests – They often reward you with decent coin payouts
- Bring back Valuable items from Topside – Things like music cassette tapes, rubber ducks, and other miscellaneous items can sell for a surprising amount
- Sell gear you don’t need – I know it’s tempting to keep everything, but sometimes you gotta let go
- Use the Free Loadout Augment and successfully extract – This is a great way to load up on items you can sell
I’ve found that combining these methods can earn me a steady stream of coins. When I’m really focused on expanding my stash, I can usually make enough for the next expansion in just a few gaming sessions.
The Expedition Project Method (Advanced Strategy)
Now, this is a more advanced strategy that I only recommend if you’re really committed to the game. There’s a time-limited way to expand your stash by completing Projects and finalizing them during specific windows.
From what I’ve learned, you need to:
- Reach level 20 (that’s when Projects unlock)
- Complete a Project
- Finalize it during the Expedition window (which happened to be December 15-20, 2025, but these dates change)
Here’s the catch – this method resets your entire character. That means losing your skill points, inventory, stash, and resources. It’s a pretty drastic measure, but from what I’ve heard, it’s the only long-term way to consistently boost your stash amount as more content gets added to the game.
Personally, I haven’t tried this method yet because I’m too attached to my current character and progress. But if you’re starting fresh or don’t mind the reset, it could be worth considering.
How to Increase Your Backpack Space?
Now let’s talk about your personal backpack inventory – the one you take with you on missions. This is crucial because no matter how big your stash is, if you can’t carry enough loot back from missions, you’re missing out.
Using Augments to Expand Backpack Space
The primary way to increase your backpack space is by equipping Augments. When I first discovered this, it was a game-changer for my looting efficiency.
Here are the best Augments for increasing your inventory space:
Looting MK.1 Augment
- 8 Additional Inventory Slots
- 1 Safe Pocket
- How to get it: Craft it early at the Workbench or buy it from Lance (Clinic Trader) for 1,920 coins
This was the first Augment I crafted, and let me tell you, those extra 8 slots made a huge difference. I could finally grab all the good stuff without having to leave valuable items behind.
Looting MK.2 Augment
- 12 Additional Inventory Slots
- 3 Augmented Slots for Trinkets
- 2 Safe Pockets
- How to get it: Craft it after finding the blueprint or buy it from Lance for 6,000 coins
When I upgraded to the MK.2, I felt like I had hit the jackpot. Those extra slots, plus the trinket slots, really opened up my looting possibilities.
Other Augments
While the Looting Augments are best for inventory space, I should mention the other options:
- Combat MK.1: 16 backpack slots (good if you focus on fighting)
- Tactical MK.1: 15 backpack slots (great for stealth players)
But honestly, if you’re like me and you’re all about that loot, the Looting Augments are the way to go.
Finding and Crafting Augments
I’ve found Augments in two main ways:
- Finding them in the world – Sometimes you’ll get lucky and find Augments during missions
- Crafting them at the Workbench – This is my preferred method since it’s more reliable
Crafting requires specific materials, but I’ve found that it’s worth the effort. Plus, crafting Augments uses up materials that would otherwise be sitting in your stash taking up space.
Advanced Inventory Management Tips
Expanding your inventory is great, but managing it well is just as important. Here are some tips I’ve picked up that have saved me countless headaches:
The Magic Merge Stacks Button
I can’t believe how long it took me to discover this, but there’s a “Merge Stacks” button in your inventory that’s an absolute game-changer. Here’s how I use it:
- Open your inventory in Speranza
- Look for the Merge Stacks button next to the sorting options
- Click it and watch the magic happen
This button automatically combines any loose items that are taking up unnecessary space. For example, I used to have multiple small stacks of shotgun ammo – one with 20 shells, another with 12, and another with just 2. That was three inventory slots! After merging, I had one stack of 34 shells (well, technically one stack of 20 and another of 14, but you get the idea).
Ammo is the biggest culprit for this, but bandages and other consumables do it too. I make it a habit to hit the Merge Stacks button every time I return to Speranza.
Smart Selling and Recycling
When my inventory gets full, I used to panic and start selling everything in sight. Big mistake. I learned the hard way that some items you can sell are actually needed for crafting.
Here’s my system now:
- Check what you need for crafting – Before selling anything, I check my active crafting projects to make sure I’m not selling something I’ll need later
- Sell true valuables – Things like music cassette tapes, rubber ducks, and rosary beads that don’t have crafting uses
- Recycle junk carefully – I recycle things like camera lenses, candle holders, and radios, but only after confirming they’re not needed for upgrades
I once made the mistake of selling a bunch of pillows, only to realize later that I needed them to upgrade Scrappy at the Workshop. Learn from my mistake – always double-check before selling!
Repair and Upgrade Your Gear
One thing that really helped me clear up inventory space was focusing on repairing and upgrading my existing gear instead of keeping multiple duplicates. Here’s what I do:
- Repair all my shields – They have durability meters that need maintenance
- Upgrade my guns to max durability – No point keeping a backup if my main weapon is in top shape
- Apply weapon mods – Crafting and applying mods consumes materials and frees up space
I used to keep three or four versions of the same gun “just in case.” Now I focus on making one really good version of each weapon type, and it’s made a huge difference in my inventory management.
Craft Quick Use Items
Here’s a tip I love: craft Quick Use items like smoke grenades, noisemakers, and door blockers, then take them with you on missions. Not only are these items super useful in combat, but crafting them consumes materials, and taking them out of your stash frees up space.
It’s a win-win situation – you get useful combat items and clear inventory space at the same time. I try to craft a few of these before every major mission.
What to Keep and What to Toss?
One of the biggest questions I get from other players is what items they should prioritize keeping in their limited inventory space. Based on my experience, here’s what I recommend:
Must-Keep Items
These are the items I never sell unless I have absolutely massive quantities:
- Lemons and apricots – Rare crafting materials that are a pain to find when you need them
- Olives – Used in various upgrades and not super common
- Rusted tools – Essential for many crafting projects
- Mechanical components – Always needed for something
- Rare upgrade materials – If it’s rare and used for upgrades, I keep it
Items to Sell or Use
These are items I’m more liberal about selling or using:
- Common crafting materials (fabric, scrap metal) – These only stack to 50 and are easy to find. Plus, Scrappy gives you a bunch for free after every round
- Duplicate weapons – Unless they have special mods I want to transfer
- Excess ammo – Beyond what I need for a few missions
- Common consumables – I keep a reasonable amount but sell the rest
Items to Donate
If you’re working on Expedition Projects, consider donating excess common materials. It’s a great way to clear out your inventory while also contributing to long-term benefits for your character.
My Personal Inventory Management Routine
After all my trial and error, I’ve developed a routine that keeps my inventory under control. Here’s what I do after every gaming session:
- Merge all stacks – First thing I do is hit that Merge Stacks button
- Sell valuables – I go through my Misc. category and sell anything I don’t need for crafting
- Repair and upgrade – I check all my gear and repair/upgrade as needed
- Craft Quick Use items – I make a few smoke grenades or other useful items
- Check stash space – If I’m getting close to full, I start considering my next expansion
- Plan for next session – I make a note of what materials I need for my next crafting projects
This routine takes maybe 5-10 minutes, but it saves me so much hassle in the long run. I never start a gaming session with an overflowing inventory anymore.
Common Inventory Mistakes to Avoid
Let me share some mistakes I’ve made so you can avoid them:
Mistake #1: Hoarding Everything
I used to keep every single item I found “just in case.” Bad idea. Most common materials are easy to find when you need them, and keeping massive quantities just clogs up your inventory.
Mistake #2: Ignoring the Merge Stacks Button
I can’t stress this enough – that Merge Stacks button is your best friend. I can’t believe how long I played without using it regularly.
Mistake #3: Not Planning Ahead
I used to expand my stash without thinking about future costs. Now I always try to have enough coins saved for the next expansion before I need it.
Mistake #4: Selling Crafting Materials Blindly
I once sold a bunch of materials I needed for an important upgrade because I didn’t check my active projects first. Always double-check before selling!
Final Thoughts
Increasing your inventory size in ARC Raiders isn’t just about having more space – it’s about improving your overall gaming experience. When I’m not constantly worrying about running out of room, I can focus on what really matters: exploring the world, fighting ARC machines, and enjoying all the loot I find.
Remember, expanding your inventory is an investment in your enjoyment of the game. Yes, it costs coins and takes some planning, but trust me, it’s worth every penny.
Start with the basics – expand your stash when you can, get a good Looting Augment, and develop smart inventory management habits. Before you know it, you’ll be swimming in inventory space and wondering how you ever managed with those tiny starting slots.
Happy looting, Raiders! And may your inventory always have room for just one more item.
FAQ
How much does it cost to expand stash in ARC Raiders?
The first stash expansion costs 5,000 coins and gives you 24 additional slots. Each subsequent expansion costs 5,000 more coins than the previous one (10,000, 15,000, etc.). The maximum stash size is 280 slots.
What’s the best Augment for inventory space?
The Looting MK.2 Augment is the best, offering 12 additional inventory slots, 3 augmented slots for trinkets, and 2 safe pockets. If you’re just starting, the Looting MK.1 is a great affordable option with 8 additional slots and 1 safe pocket.
How do I get more coins for stash expansion?
Complete quests, bring back Valuable items from missions, sell gear you don’t need, and use the Free Loadout Augment for successful extractions. I’ve found that combining these methods provides a steady income of coins.
What should I do with excess crafting materials?
You can sell them, use them for crafting/upgrading, or donate them to Expedition Projects. I recommend keeping a reasonable amount of rare materials but being liberal with selling common ones since they’re easy to find.
Is there a way to reset and get more stash space?
Yes, by completing Projects and finalizing them during specific Expedition windows. However, this resets your entire character including skill points, inventory, and resources. It’s an advanced strategy for committed players.
How do I manage inventory efficiently?
Use the Merge Stacks button regularly, sell unnecessary valuables, repair and upgrade existing gear instead of keeping duplicates, and craft Quick Use items to consume materials while freeing up space.
Looking for more gaming tips? Check out our gaming guides section for more strategies and walkthroughs!